Introduction
On this page we focus on the steps necessary to weave herringbone maka ‘oʻeno (2-ply twill). This involves alternating between the horizontal and vertical maka ‘oena 2-ply forms. Below we first show a review of weaving the horizontal maka ‘oʻeno. Then we show how to weave the vertical form.
The use of two-ply twill and greater twill multiples for weaving mats, baskets, hats, headbands and other objects has been documented and in use throughout Polynesia and Micronesia for more than 200 years.
In the early 1920’s Te Rangi Hiroa (Peter H. Buck) also wrote a remarkable series of papers outlining the weaving (plaiting) of mats and other objects in particular areas of Polynesia including New Zealand. In one of the New Zealand papers (p 715) he described how to weave (plait) both the horizontal and vertical types of 2-ply twills (maka ‘oʻeno) for making baskets using flax.
We will use photographs and a simple homemade weaving tool to clarify Buck’s approach for weaving both types: horizontal and vertical maka ‘oʻeno. After practicing these examples the reader can alternate the two types to weave herringbone maka ‘oʻeno.
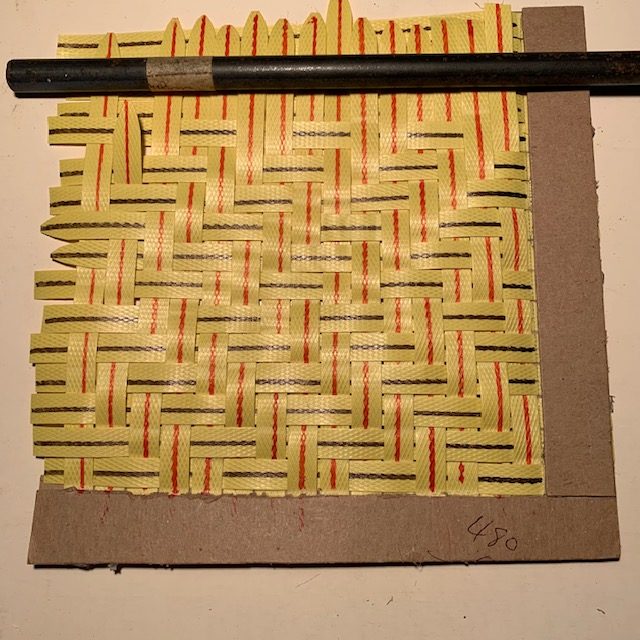 Figure 1. Showing vertical 2-ply twill changing to horizontal twill about halfway up giving the herringbone pattern
Weaving the Horizontal Form of Maka ‘Oʻeno
In showing how to begin from the normally used horizontal twill (maka ‘oʻeno or hat twill) I will be using the simple weaving tool pictured above that we have described earlier. A metal bar temporarily holds the tapes in place for photographic purposes.
 Figure 2. This is how I begin the 2-ply maka ‘oʻeno weave.
Figure 2 shows how I begin the 2-ply maka ‘oʻeno weave on the weaving tool. The tapes which are horizontal are called the moe. The vertical ones are called the ku. So I begin with one moe down and alternating pairs of ku on top of it. Next we are going to fold some of the ku over the moe. I believe that during the weaving process, the weaver would begin from the right side perhaps dealing with only 4-5 ku or less at a time.
 Figure 3. The beginning of the maka ‘oʻeno weave
In Figure 3, pairs of ku have been folded down, one of them over the first moe. We can now see what will be a familiar sight – pairs of “stairs” going upward from right to left. Note that there is a pair of “stairs” on the left hand side of Figure 3.
 Figure 4. The second moe is woven in
In Figure 4 we have woven in the second moe and now different ku have been folded back in order to maintain the “stair” pattern. Within each group of four ku, one of them will be folded up and another one folded down. And each time a ku is folded up or down, it will cover two (2) ku beneath it, hence the term 2-ply. Note also that the pair of “stairs” on the left hand side of Figure 3 has moved to the right in Figure 4. As we add in each moe, the four ku unit moves to the right.
 Figure 5. We weave the third moe in.
We have woven three moe into the matrix.
 Figure 6. We weave the fourth moe in.
We weave the fourth moe in and the groups of four ku continue to move to the right.
 Figure 7. We weave the fifth moe in.
Five moe are now part of the matrix.
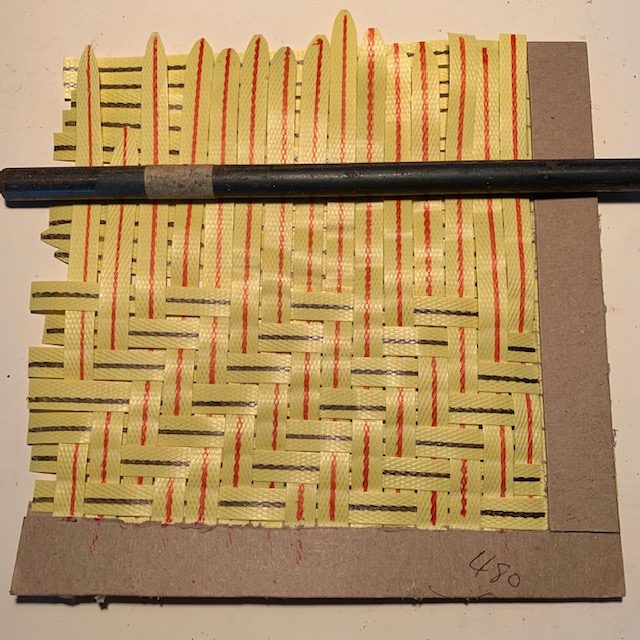 Figure 8. We have woven in additional moe and ku which we temporarily hold down for a photo.
We add additional moe and ku. Now we can clearly see the maka ‘oeno pattern in Figure 8.
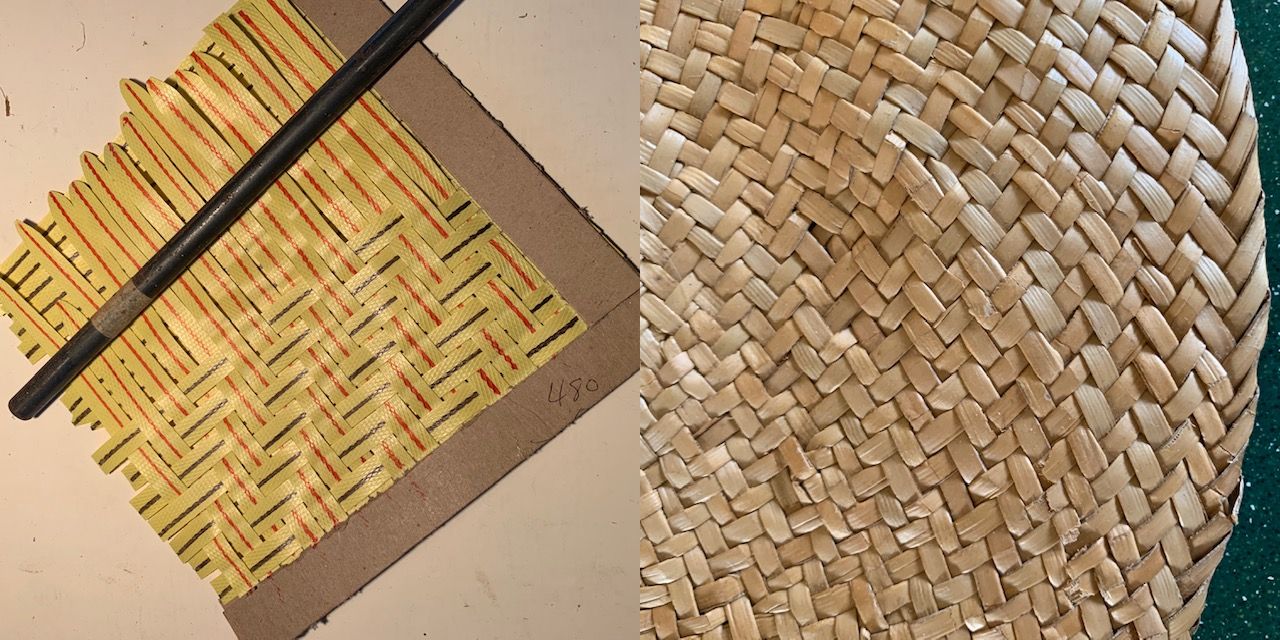 Figure 9. We tilt the weaving tool counter clockwise. Compare with a typical maka ‘oeno hat weave on the right.
Figure 9 shows a more conventional view of the maka ‘oeno pattern on the weaving tool as seen from the edge of the hat brim. We show a lauhala papale (hat) woven with horizontal maka ‘oeno weave for comparison.
Weaving the Vertical Form of Maka ‘Oena
If you feel confident in terms of dealing with the horizontal maka ‘oeno weaving pattern, it’s time to weave the vertical maka ‘oeno. When we understand how to weave both types, we can switch back and forth and make the herringbone pattern.
 Figure 10. The beginning of the vertical 2-ply twill
It looks almost the same doesn’t it? But there’s something different about it.
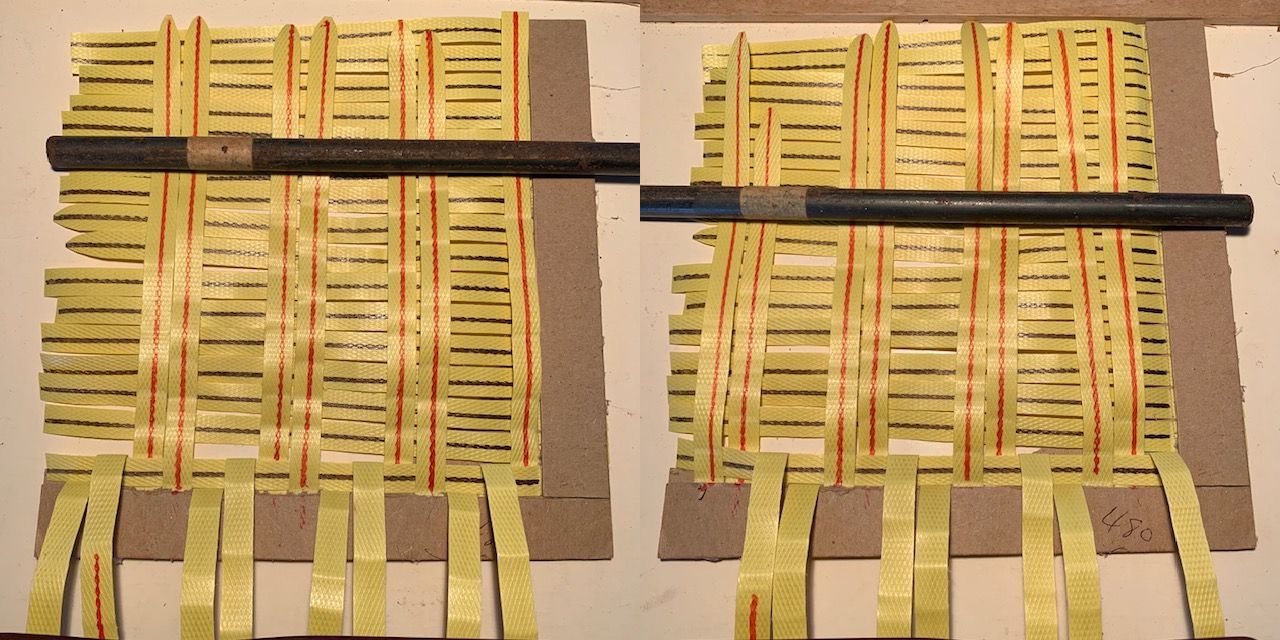 Figure 11. Horizontal maka ‘oeno on the left, vertical maka ‘oeno on the right
Figure 11 compares Figure 3 and Figure 10. We can see right away that in Figure 3 (left side) the “stairs” go from lower left to upper right. In Figure 10 (right side) the “stairs” go from lower right to upper left. So basically, the vertical maka ‘oeno is the mirror image of the horizontal maka ‘oeno that we first wove.
 Figure 12. Adding the second moe
We now continue with the weaving process, moe by moe as we did earlier. Figure 12 shows the second moe woven in. Like the horizontal maka ‘oeno, for each group of four ku, one koana folds down over two moe and another folds up over two moe. And when you are finished, you will have one pair of ku heading upwards and another pair heading downwards. Hence the ulana expression for weaving maka ‘oeno “two up, two down”.
 Figure 13. Adding in the third moe
Figure 13 shows the third moe woven in.
 Figure 14. Adding in the fourth moe
Figure 14 shows the fourth moe woven in.
 Figure 15. Adding in the fifth moe
Figure 15 shows the fifth moe woven in.
 Figure 16. We have added additional moe and folded ku upwards for clarity
Figure 16 shows eight moe woven in and all the ku folded upwards for photographic clarity.
 Figure 17. Showing Figure 16 tilted clock wise.
Figure 17 shows Figure 16 tilted to the right into a position more familiar to the hat weaver.
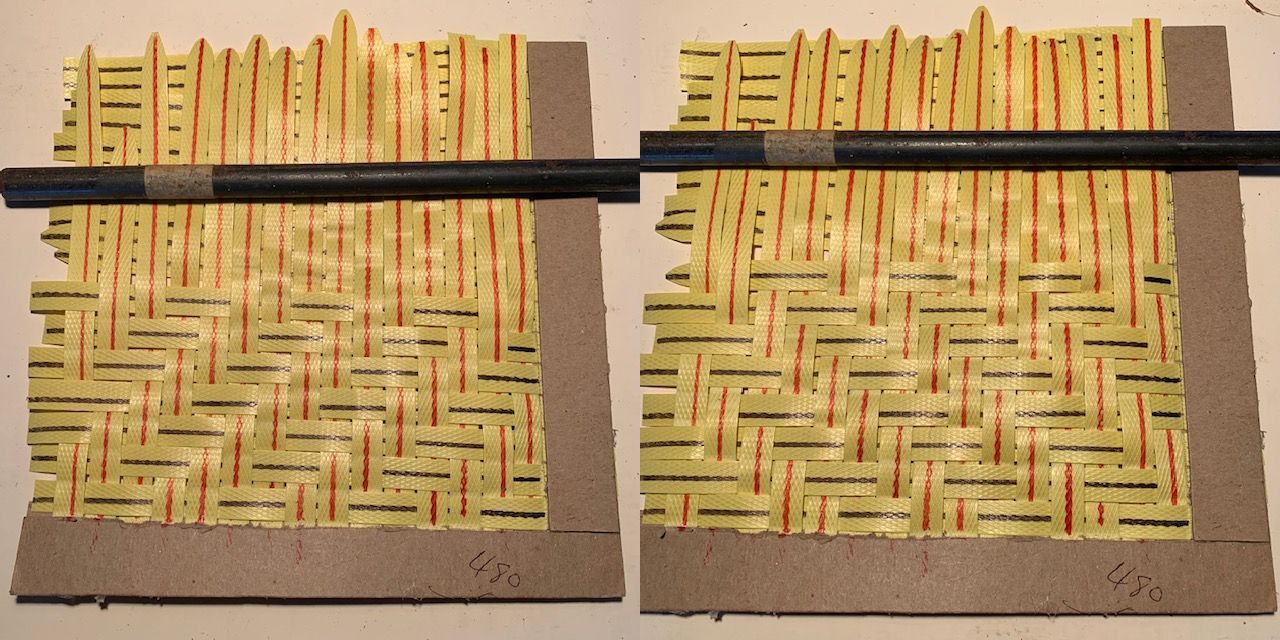 Figure 18. Horizontal (left) and vertical (right) maka ‘oena
Figure 18 shows a comparison of the horizontal (left) and vertical (right) maka ‘oeno weaves. It took me a little while to get that in the horizontal weave, all the red ku were going from lower left to upper right just like the “stairs”. And in the vertical weave the red ku were going from lower right to upper left, again just like the “stairs” in the weaving process.
 Figure 19. Changing from vertical to horizontal maka ‘oena halfway up the weaving tool
Changing from One Form to Another
Figure 19 shows an example of combining both types of maka ‘oeno weaving. I hope you can now imagine that by switching back and forth with hats of two colors (anoni papale) you can create a zigzag pattern.
To do the actual switching back and forth, look carefully at Figure 11 to see where you are in the weaving process, and then what changes you need to make to move to the other form. Printing out Figure 11 may help. Here’s a pdf file to download:
Compare Horizontal n Vertical Twill patterns
I enjoy writing these pages and hope that they are interesting and useful to the reader. I’ve stopped weaving/building at this time and still need to generate some income in order to continue to expand this website with more useful articles. If this page was helpful to you and you would like to make a $10.00 donation in order to have more pages like it, please use the donation button below. Thank you.