Introduction
Lauhala hats with neatly woven embellishments called “love knots” or “loverʻs knots” have been around for some time. One need only Google “lauhala hat love knots” ( without quotes ) to see dozens of different styles with these knots both along the sides and the brim of the hats. Ed Kaneko among others was skilled at this type of embellishment. The knots, which are used in a number of current Hawaiian hats and many other lauhala articles with bias weave (diagonal), use four koana. And some hats are really interesting to try to emulate. Others show more classic styles.
These knots should not be confused with another similar looking knot also called a love knot as well as box knot. These simpler knots use only two koana. Here are some links to the simpler knot making a variety of articles ( coolcreativity.com ; cute earings from lauhala ; even lessons in Japanese ; and finally a paracord YouTube video ). Hats, drinking glass covers, place mats and many other articles are made using this approach.
A General Description of the Weave
 Figure 1. Shows how the opposing koana spiral around one another
Looking carefully in the picture above we can see that pairs of koana spiral around each other going downwards from upper left to lower right and from upper right to lower left. I stared at this picture for about a week and then created the suggested weaving sequence below. I’m sure that there are many ways of weaving this embellishment. The steps below are only meant to be a beginning and a discussion opportunity with your teacher.
Weaving Sequence
For smooth folds the koana need to be soft and flexible because youʻre going to be making tight twists and folds. Keeping the koana damp as well as pre-weaving softening has been helpful to me.
To begin:
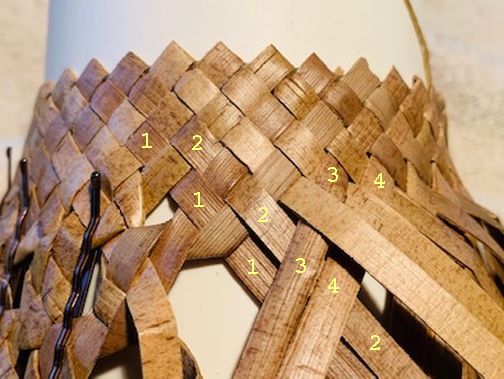 Figure 2. We first choose pairs of opposing koana
As a preliminary, I’ve woven several rows of maka moena using 3/16″ wide koana. And as you can see to the left, Iʻve already begun to make some knots. To start the folding process, youʻll need to have one pair of koana coming from upper left to lower right ( 1, 2 ) and another pair from upper right to lower left ( 3,4 ).
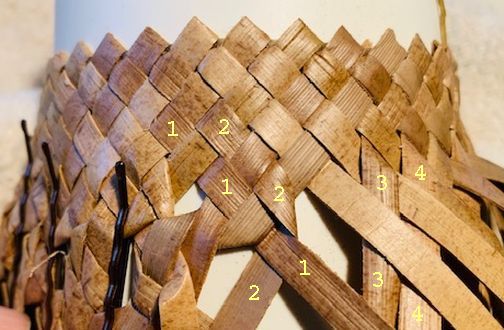 Figure 3. Now we weave koana 2 under koana 1
Begin the process by folding koana 2 under koana 1 above.
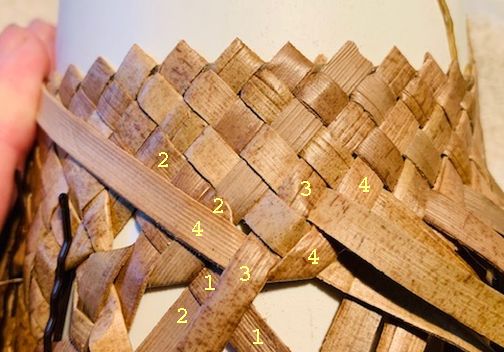 Figure 4. Then similarly we weave koana 4 under koana 3
Now fold koana 4 under koana 3. At this point we have two koana ( 1, 3 ) which are pointed straight ahead and another two koana ( 2,4 ) which are folded around their partner.
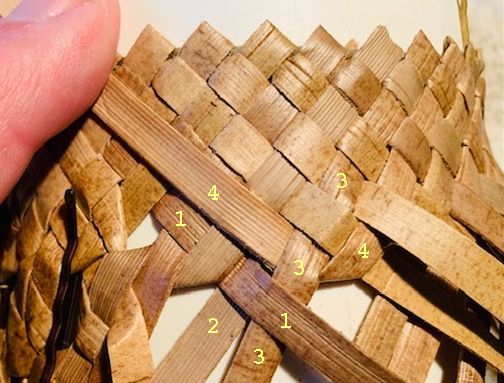 Figure 5. Fold koana 1 over koana 3.
Then fold koana 1 over koana 3. This step is very important and easy to miss! And you may wonder why we didn’t do this earlier? To satisfy yourself, you might wish to change the order of folding and see if it’s easier for you.
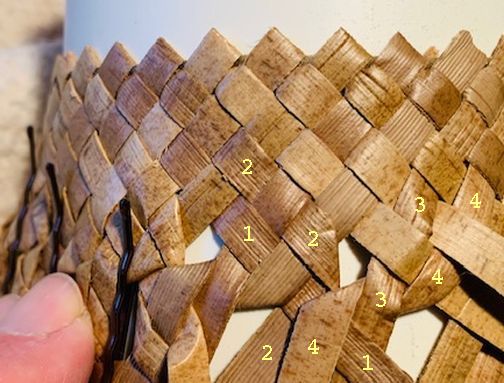 Figure 6. Now fold koana 4 down.
Now fold koana 4 down and parallel and beside koana 3. Finally fold koana 2 over koana 4 and under koana 3. Tighten up the folds and you’re done with this knot for the moment.
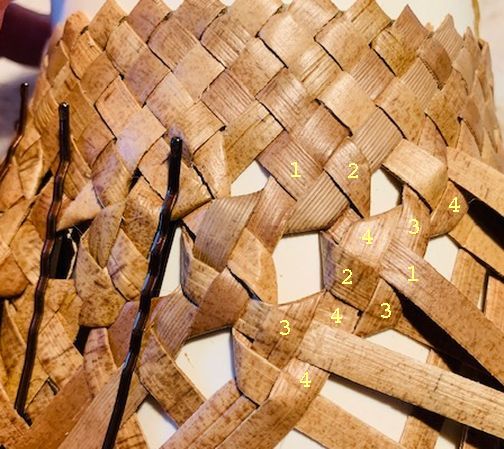 Figure 7. The finished knot and another besides.
Here is the finished knot. Now we’ve also joined up with a finished knot to the left to create a third knot below the first two.
When you are finished with each knot, there will be two pairs coming out from the bottom. To attach to an adjacent knot, just imagine that you are back at the beginning of the sequence with two koana going straight and two koana twisting around. The koana make spirals along the diagonals in both directions. As usual, keeping the proper tensions and spacing will be a challenge…
This knot remains “loose” when you are finished until you lock it into a maka moena weave as shown below. That is why there are many bobby pins in the picture. I also donʻt really know whether itʻs best to complete an entire row and then go to the next or work down a couple of rows at a time. Experience will tell for each user unless you are fortunate to have an experienced kumu who will share his/hear knowledge.
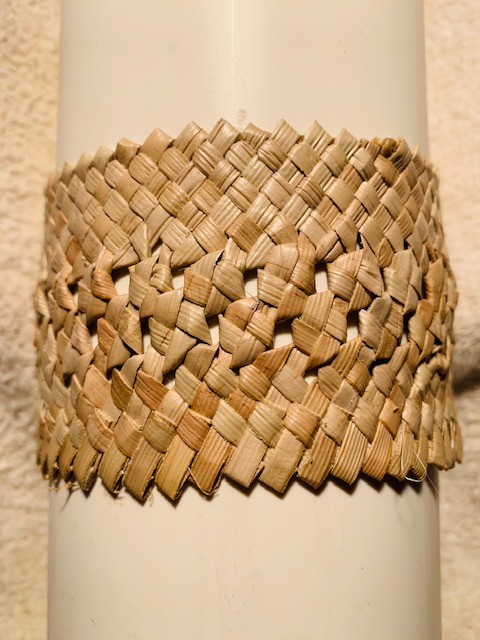 Figure 8. A sample
Figure 8 shows a practice piece done on a length of 3 1/4″ PVC pipe. I first put down twine as will be discussed in a future page for beginning the pāpale pāʻole, then began the maka moena weave for several rows. In this case the koana are 1/8″ wide. Then I wove several rows of knots, then more rows of maka moena.
At this point, if this were the beginning of the brim, another piece of twine would go in which would tighten up the crown. This second use of twine to help with the weaving process is discussed here.