Introduction
In most modern lauhala hats with a crown, there is a decorative rectangular section in the center of the crown called the piko. The piko may be a simple rectangle as was common in earlier times or a more intricate form as shown below. In addition, earlier forms used primarily the check weave (maka moena) to make the rectangle. These days the majority of hats are woven with the two-ply twill weave (maka ‘o’eno shown below), having even gone so far in acceptance that modern Hawaiian dictionaries even translate maka ‘o’eno as “hat weave”. Some current lauhala weaving festivals offering classes even require knowing how to weave the piko below before beginning to weave a hat or other articles such as purses, handbags and bottle covers.
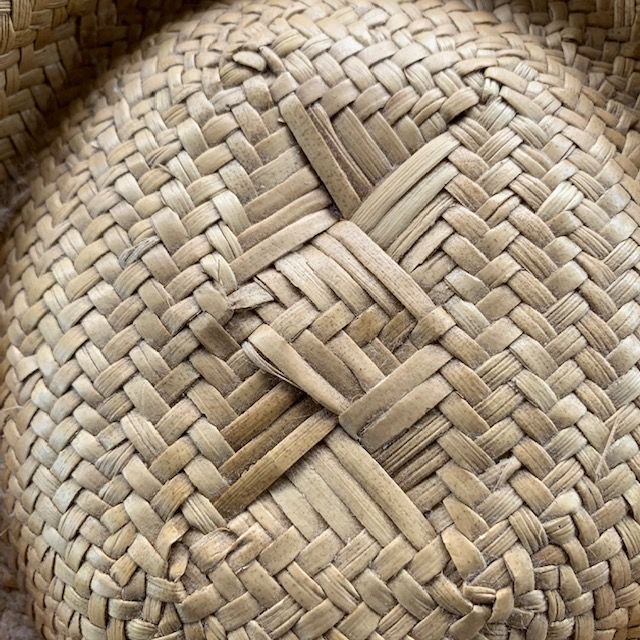 Figure 1. A double piko in the top of a modern Hawaiian hat
But the piko serves more than a decorative function. The length of the lauhala strips (koana) which are of sufficiently high quality for hats is generally less than 24″. The piko serves the purpose of joining pairs of strips together so that from the center of the hat to the edge of the brim, these strips (koana) will be in a single unbroken piece of good quality.
Of course many additional strips will be needed to finish the hat as the piko is first expanded to the pa and then over and down the form (ipu) and out to the edge of the brim. But how to weave the piko shown above? Below I show one way of doing this which was shown to me by my wifeʻs Auntie Rosie using her hats as examples and by the late Joanne Park at a lauhala weaving class at the Kamana Senior Center in Hilo. It’s likely that a number of other approaches exist as well.
Weaving the Piko
Choose high quality leaves, clean and soften them. Cut the strips into the widths of your choosing, but keep the strips attached to the uncut portion of the leaf (lau or lauhala). Some call this grouping a koana. For others a koana is a single strip. You will need eight (8) koana to weave the first part of the piko. If you are only going to practice making the piko, the lauhala need only be 10-12″ long. Figure 2 shows only five strips per koana for simplicity of explanation. These strips are 3/16″ wide. Figure 1 shows 6 strips per koana.
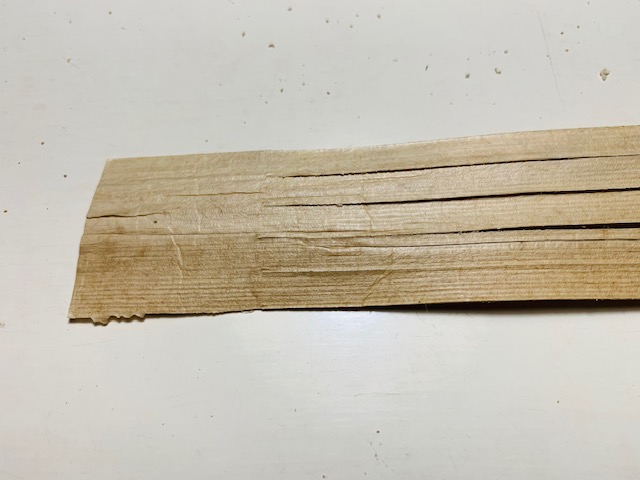 Figure 2. Strips cut but still attached to the end of the lau. The group is also called a koana.
The upper surface and underside of the leaf are different in that the underside is duller and more open to receiving moisture. The upper surface is more shiny and more water resistant. Usually the upper surface of the leaf is on the outside of the hat. Although it seems counter intuitive, we are going to join the pairs with the upper surfaces facing each other. When that is done and the strips are opened up, the upper surface of the leaf will end up on the outside of the finished hat.
We will join pairs of koana using waxed garden twine. It ties well and doesnʻt slip around. If you wish to use smaller material for the sewing, wax heavy cotton thread using beeswax (available from any sewing department).
First we’ll need to join two pairs of koana together. Then we’ll join another of these pairs to the first pair to make a “unit”.
We begin with a length of twine about 16-18″ long. This length is more that we need but it’s easier to trim the long pieces off than join more line to the original and fight the knots during the weaving of the thread.
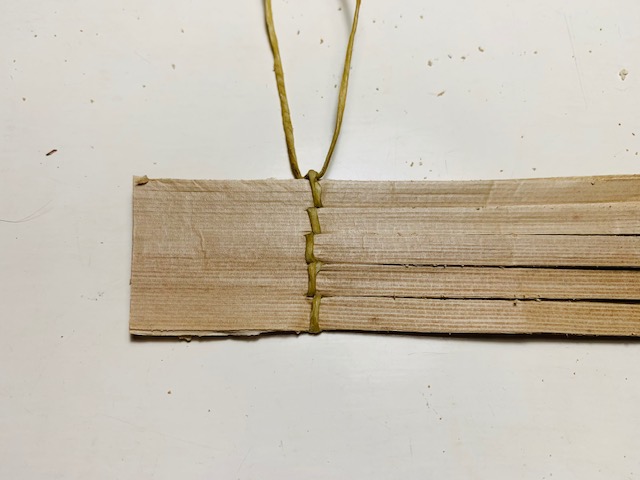 Figure 3. We have sewn two koana together to make the first pair
To begin, put the middle of the line against the left edge of a pair of koana at the point where the cut lines begin. Now take one end of the line and pass it through the first cut, then take the other end of the line and go through the same cut in the opposite direction. Repeat this process until you have reached the right side of the pair. Try to sew the lines as straight as possible as you are going along. Firm up the lines and then tie an overhand knot. See Figure 3.
Now begin the same process again using the second pair of koana. The left side of the second pair rests against the overhand knot as you begin. When you have completed the stringing of the second pair, firm up the twine and tie a square knot so that the two pairs don’t come apart. See Figure 4. Great! You’ve just finished one “unit”. Now make another “unit”.
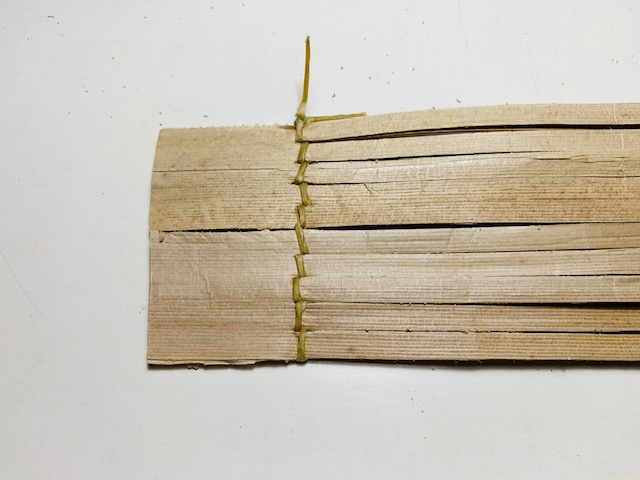 Figure 4. Two “units” joined together.
Now take each of the strips (koana) in the “unit” and fold them outward so that each half is at right angles to the join. I use my fingernail to make a little crease where the cut stops to make the bending a little easier. Where the bent strips meet the upright butt part (and where the twine is) we will call the seam. See Figure 5.
Note that the underside is facing upwards when you have done this. This is correct because for at least the first part of the weaving, the future hat will be inside out to make it easier to add in additional koana during the making of the pa and much of the crown.
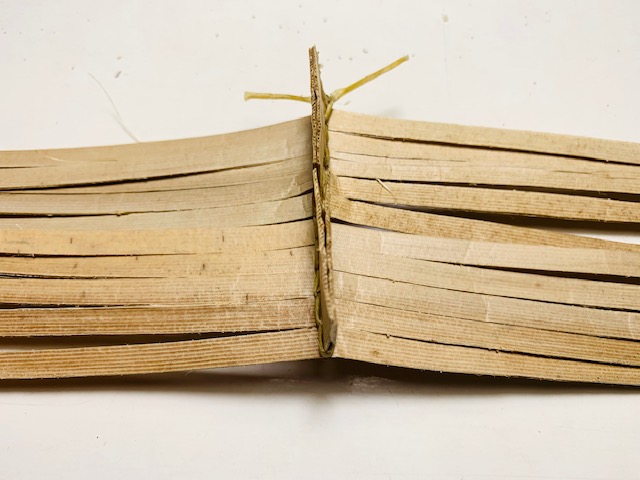 Figure 5. We have bent the koana outwards at the seam.
Now we’re going to bend the pairs at right angles so that the joined koana make an “L” shape as seen from above. Two sets of koana now overlap each other. See Figure 6.
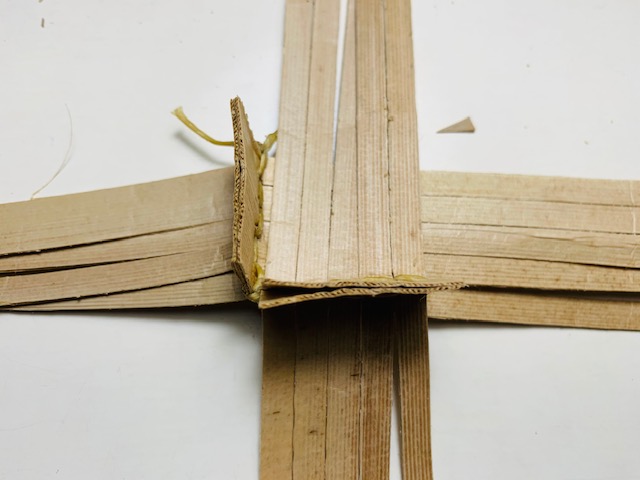 Figure 6. We have turned the pairs at right angles to one another.
Let’s now weave one of the “units” so that the concept of how we want the rest of the “units” to join up will be clear. Because it’s our first try with this type of piko, let’s just do a simple maka moena check weave. Figure 7 shows the finished weave
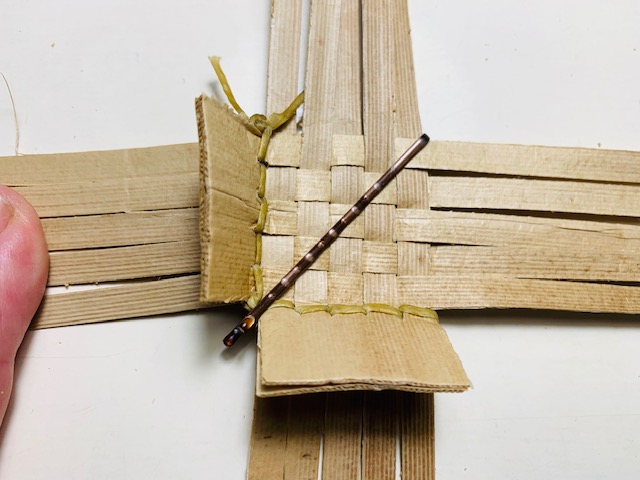 Figure 7. Finished check weave of first unit
Looking at the first vertical row, we can see that we began with three strips up and two strips down when the “unit” was in the same orientation as in Figure 7.
When you weave the second “unit” I believe that it is necessary to weave the strips exactly the same as the first one. The two upright portions should be facing the same way when you start as you did in the first “unit”. And if you began with two strips down and three strips up for the first vertical row, you should do the same for the second “unit”.
When you have finished the second “unit”, it’s time to weave the two “units” together. Note the corner where the two upright koana meet. It’s the halfway point in Figure 4. Orient the two “units” so that these two corners are pointing at each other. See Figure 8 below. An unwoven, overlapping section is at the top of the figure.
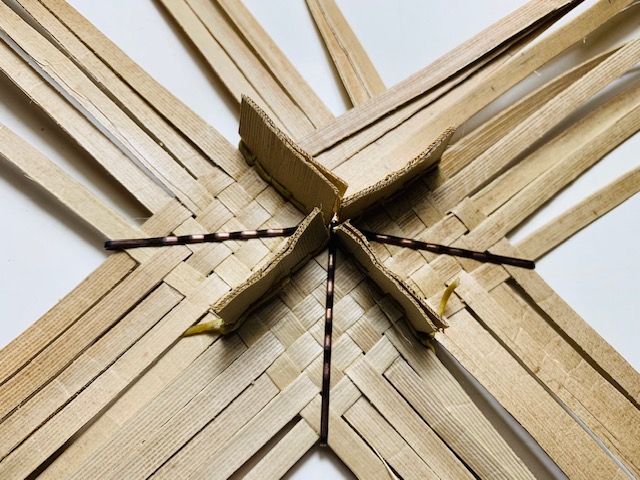 Figure 8. One of the sections woven like Figure 7
When you are beginning this new section, it is very important that the weaving is a direct continuation of the already woven sections on either side of it. See Figure 9 for a more clear view.
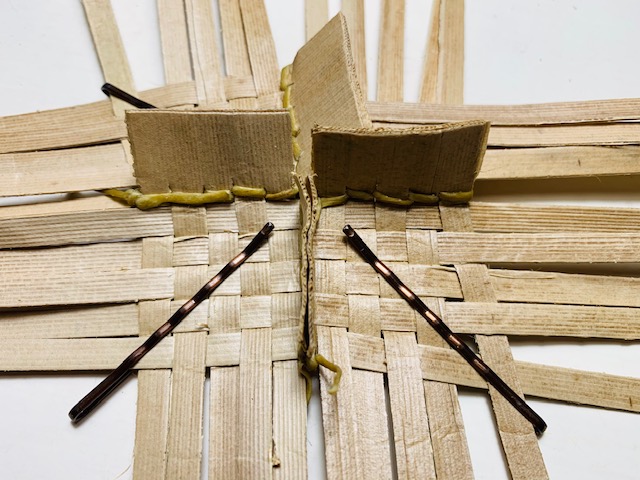 Figure 9. Same stage as in Figure 8 but from a slightly different angle.
Follow a single row from the right to the left. Notice that the same over-under weaving continues across the seam. You can see this even more clearly in Figure 10.
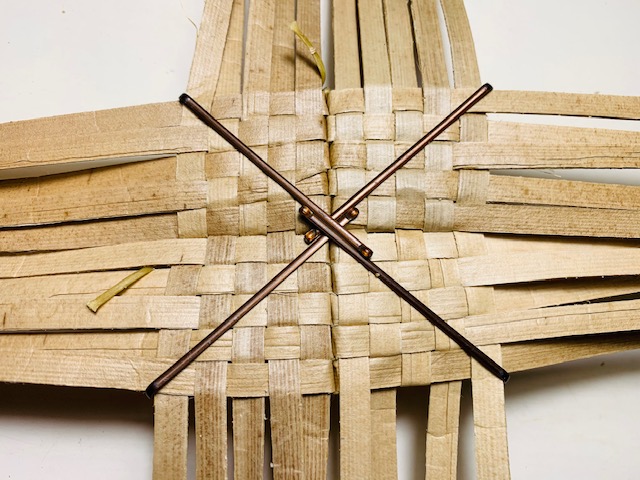 Figure 10. This figure shows the “good” side when two of the “units are woven together.
Figure 10 shows two “units” joined and all four sections woven to make a piko. Now it’s time to make another “unit” of two pairs and join that to the first group.
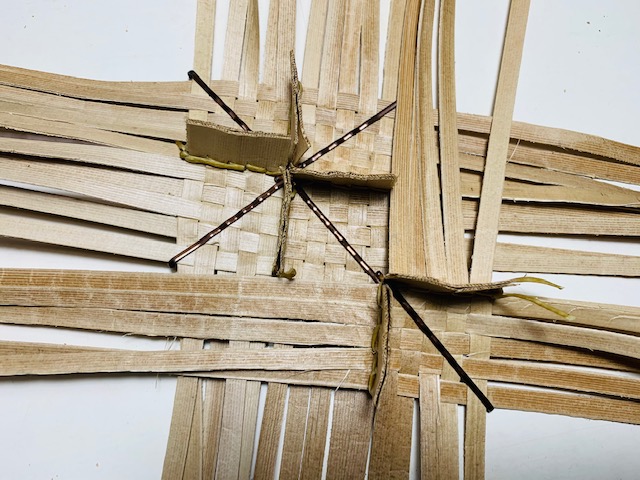 Figure 11. The corner of the third “unit” faces the first group
Figure 11 shows the orientation of the third “unit” to the first group. When you begin weaving in the two overlapping strips, just weave enough to make a square at this point. Also make sure that your weaving is compatible with the already woven material on either side.
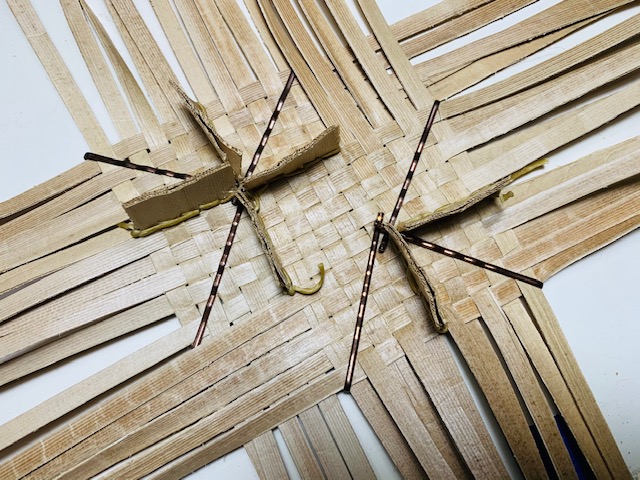 Figure 12. We weave in the third “unit”
In Figure 12 we have woven both sides of the last “unit”. Figure 13 shows a similar example of the type of piko we have woven only using the maka ‘o’eno (twill) weave instead of the maka moena (check) weave.
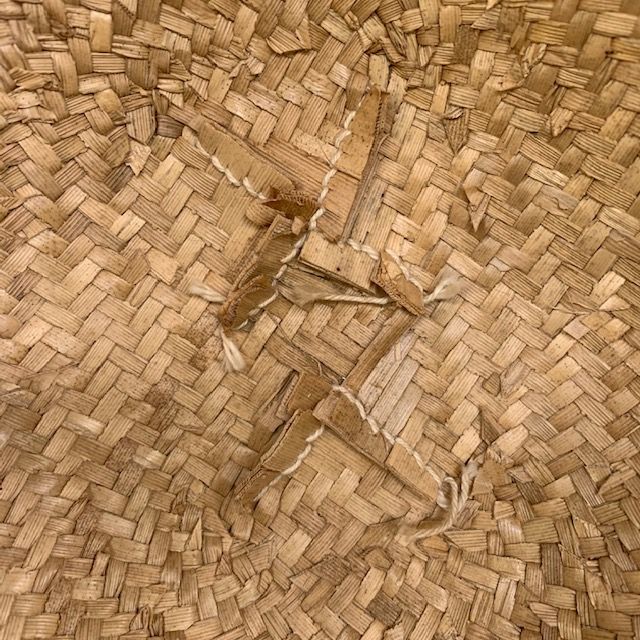 Figure 13. The underside of the hat shown in Figure 1
Figure 13 shows the underside of Figure 1 wherein the third “unit”, is woven into the first two.
We’ll stop weaving at this point, noting that the remaining overlapping strips in Figure 12 will need to be woven in during the next step, the making of the pa. The pa step is much more involved and complex and will involve making a new page.
I enjoy writing these pages and hope that they are interesting and useful to the reader. I’ve stopped weaving/building at this time and still need to generate some income in order to continue to expand this website with more useful articles. If this page was helpful to you and you would like to make a $10.00 donation in order to have more pages like it, please use the donation button below. Thank you.