Introduction
As shown in the Bishop Museum Ethnology collection, folks in Hawaii have made hats out of many materials using a variety of methods. I believe that the two most common approaches used then and today are: 1) beginning at the crown of the hat, weaving down the sides and out the brim and 2) Braiding or plaiting a very long section of material perhaps an inch or so wide and then sewing the material in a spiral, once again beginning in the center of the crown.
I don’t know whether a form was used for the plaiting approach, but I believe that a wooden form called an ipu has been used for the first approach for more than a hundred years. Forms can also used for making covers for drinking glasses, flasks, squirt bottles and condiment jars as well as Hawaiian style pillows and doorstops. These forms can be the objects themselves or wooden or PVC shapes which are the same size as the objects to be covered.
Commercially available ipu are available. Traditional Hawaiian style wooden forms in a range of sizes are available at Hana Hou in Hilo, Hawaii (808-935-4555). Frank’s Cane and Rush Supply has plastic forms in 1″ increments which some local weavers use. Other sources include Etsy, Judith M (links to many hat block sources), as well as Hatter’s Supply House.
Local Style Homemade Wooden Forms
Figures 1 and 2 show a couple of wooden forms made by my wife’s late uncle Richard. These forms are called pahu pāpale or ipu in Hawaiian ( http://wehewehe.org/gsdl2.85/cgi-bin/hdict?a=q&r=1&hs=1&m=-1&o=-1&qto=4&e=p-11000-00—off-0hdict–00-1—-0-10-0—0—0direct-10-ED–4–textpukuielbert%252ctextmamaka—–0-1l–11-en-Zz-1—Zz-1-home—00-3-1-00-0–4—-0-0-11-00-0utfZz-8-00&q=hat&fqv=textpukuielbert%252ctextmamaka&af=1&fqf=ED ). The left taller form allows for crown shaping.
 Figure 1. Front view of two homemade pahu pāpale
He made these forms by gluing a number of pieces of wood together and then shaping the wood. The size of the ipu was made close to that of the future hat for the intended wearer. The left ipu is about 7 3/4″ high and the right one is about 5 1/2″ high.
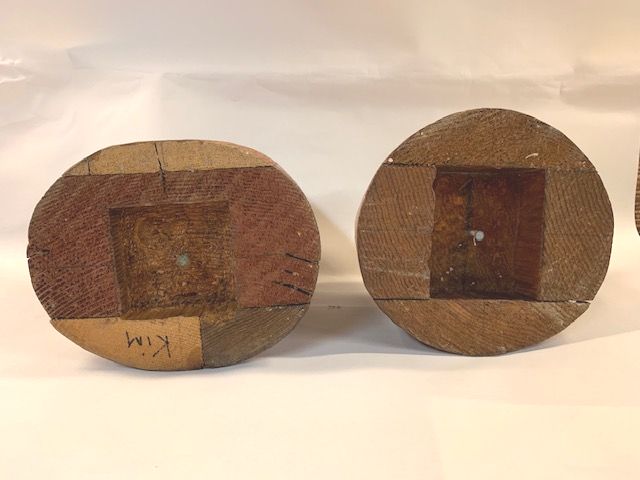
Figure 2. Bottom view of two homemade pahu pāpale
The left ipu base is 5 3/4″ x 7″ ; the right ipu base is 6 1/2″ x 7″. The left ipu base circumference is 20 3/4″ and the right ipu base circumference is 21 1/4″. Both ipus have a hollow section in the bottom with a nail in the center. The head of the nail is about 1/2″ below the surface of the bottom. The purpose of the nail is to act as an anchor for the string which is wrapped several times over the piko and pa hat as they rest on the top of the form. Generally this wrapping happens after the piko and/or piko and pa for the hat have been completed.
Making a Simple PVC ipu for a Pāpale Pāʻole (crownless) hat or Garden hat
You as the maker of your hat can make a simple ipu or form or mold which will be taylored to your own headsize or a headsize of your choosing. Then you can sew in your own sweatband into your hat and have something really spiffy.
Letʻs begin with a simple form that Iʻll later use for making a pāpale pāʻole (crownless) or garden hat. I’ve made a number of these because different owners have different hat sizes.
For this type of ipu I have used sections of PVC drain pipe for a number of my hats. Ten foot lengths are available from Home Depot and other plumbing outlet stores. Yes, ten feet is a lot, but you can share with friends, right? Itʻs also possible to use a 6″ PVC coupling but a single coupling costs about the same as the ten foot length of the thin-walled drain pipe. Buyerʻs choice.
The outside diameter of a 6″ thin-walled PVC drain pipe is about 19.6″ which is too small for most adult heads. So I take 5″ – 6″ lengths of drain pipe and begin covering them with 3″ wide strips of softened corrugated cardboard, held in place with blue or green 1″ wide painterʻs tape. The corrugated cardboard needs to be softened by gently putting it through the pasta machine on a wide setting or rolling it around your lauhala softening tool several times. You do this in order to avoid kinks in the cardboard that would make weaving the side of the hat more difficult.
|
|
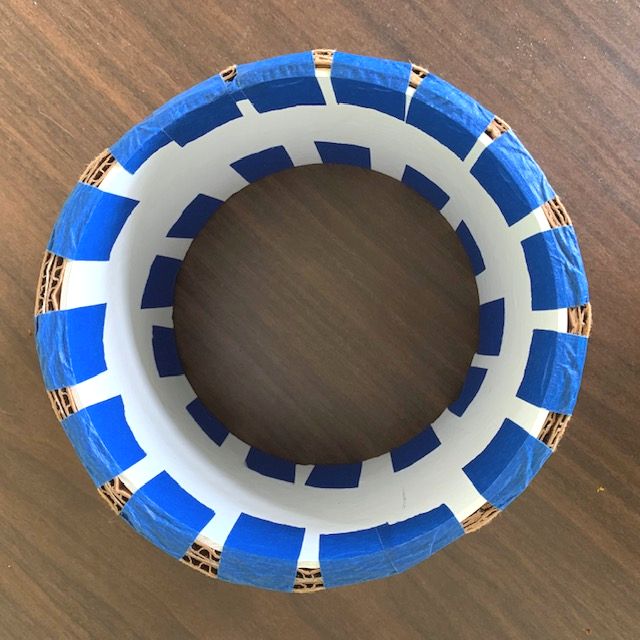 Figure 4. Top view of simple PVC ipu for papale pāʻole of two different sizes Figure 4. Top view of simple PVC ipu for papale pāʻole of two different sizes |
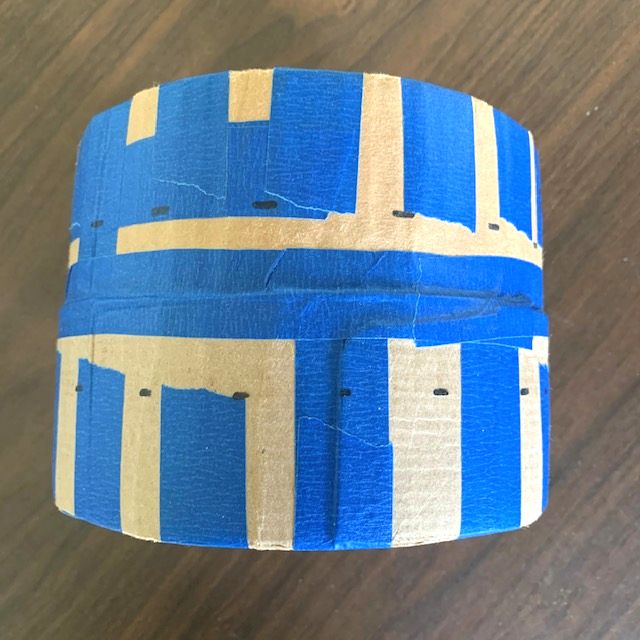 Figure 3. Side view of simple PVC ipu for papale pāʻole of two different sizes
Figures 3 and 4 show a simple PVC ipu that I used for two different sized pāpale pāʻole or garden hats. These ipu are without crowns or tops because the sides of the hat were only 1.5 – 2″ high. It’s important not to completely cover the edges of the corrugated cardboard. That’s because when we later make the pāpale pā’ole, we’ll use bobby pins to hold the side of the hat to the form to keep it from slipping while we weave the brim.
Making PVC Drain Pipe forms that are Head Shaped
In this section, I allow my inner geek to wander into the weaving world for a short while.
In most people, the outline of the perimeter of their head is oval rather than circular. Because the lauhala hat is flexible, using a circular form as shown above will be ok. But as we progress, having the form closer to what the head is actually shaped is a good thing. So we need to think about how to make the PVC drain pipe more head-shaped.
On average the width of the human head measured just above the ears is about 3/4 the length of the head at the same level. See sections 6 and 13, 99th percentile, both men and women. So we need to turn a circle into an ellipse. That is, weʻre going to soften the PVC drain pipe in the oven or a container of near boiling water and fit it over either a drawn shape on a piece of paper or a cutout piece of wood in the same shape.
For the PVC drain pipe in Figures 3 and 4, the outer diameter is about 6.25 inches. So the perimeter or circumference is 6.25 x pi (3.14) = 19.63. The following spreadsheet allows the user to calculate the shape of an ellipse with the same circumference as the PVC drainpipe. We also need to have the width of the ellipse be 3/4 of the length of the ellipse. This is taken care of in the calculations.
Forming a circle into an ellipse
For the PVC drainpipe weʻre using the width of the ellipse will be 5.33 inches and the length will be 7.1 inches.
Now we want to print the outline of the ellipse on a piece of paper. Weʻll use the Rapid Resizer website to draw the ellipse. With this website you first choose circle or ellipse and then enter the width and length of the ellipse.
Here is the pdf file that you can download and print: PVC drainpipe ellipse
At this point if you have a jig saw available, you can trace the outline of the ellipse onto the wood and cut it out. You should cut on the inside of the traced line to make sure that the wood will fit into the pipe when it’s time to do the bending.
.OK, now cut a 6″ length of the PVC pipe and smooth and flatten the edges. Pre-heat your oven to 200 degrees F ( 93 degrees C ) or heat water in a large enough pot which will easily fit the PVC piece. Place the pipe edge down in the oven/boiling water for ~5 minutes. Using oven mitts remove the pipe from the oven/pot and either place it over the wooden form or try to make it have the same outline as the printed form. Allow to cool while holding – cooling may take several minutes.
If you’re not satisfied with the shape the first time, try again. The PVC is very forgiving. If you’re using the wooden form, you can place the pipe over the form, allow the pipe to cool and hold the wooden form in place with finishing nails. Then reheat and free shape the open end so that it matches the printed form.
Now you’re ready to put on the layers of cardboard until you’ve reached the hat circumference you want. Figures 5 and 6 show such a form ready to be used. Figures 8 and 9 show the finished hat.
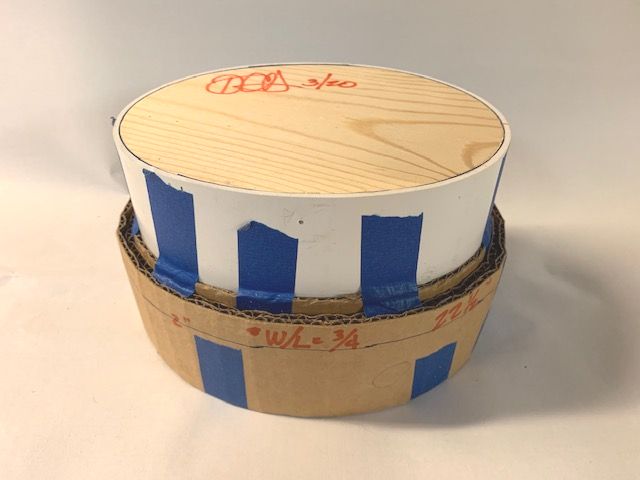 Figure 5. Top view of elliptical hat mold with cardboard in place.
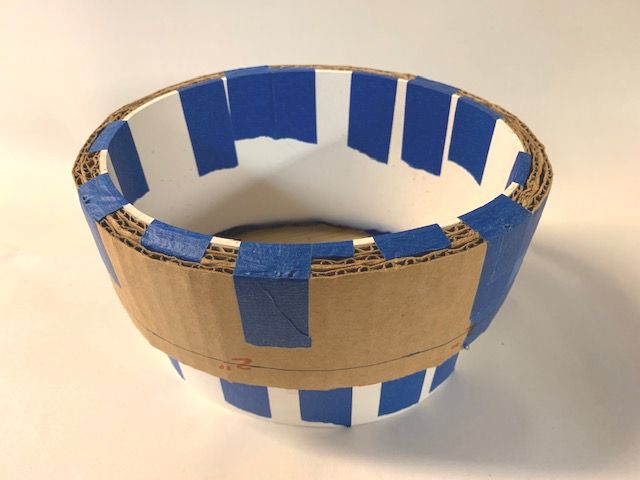 Figure 6. Bottom view of elliptical mold with cardboard in place
Because this hat has a solid surface on one end, we could alter the distribution of the cardboard up the sides to make a boater or a stovepipe hat. Then we would need a cross member across the inside of the bottom of the ipu (a piece of threaded rod or a wooden chopstick would do) to attach the string to. Remember that the string is necessary to hold the piko or piko/pa onto the ipu. Figure 7 shows such a cross member with some strings attached to it.
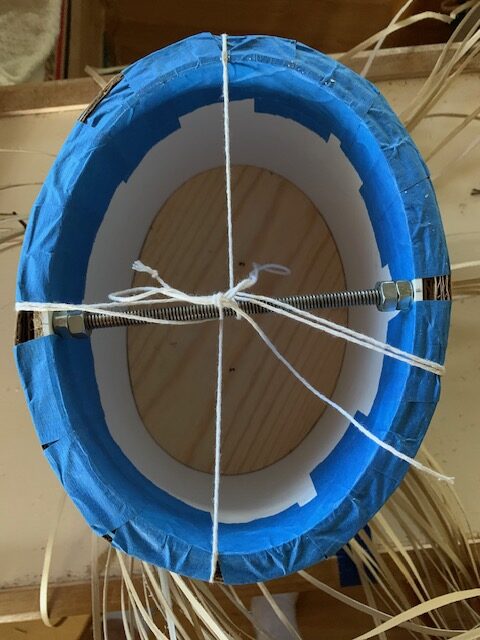 Figure 7. The underside of an elliptical ipu with cross member attached.
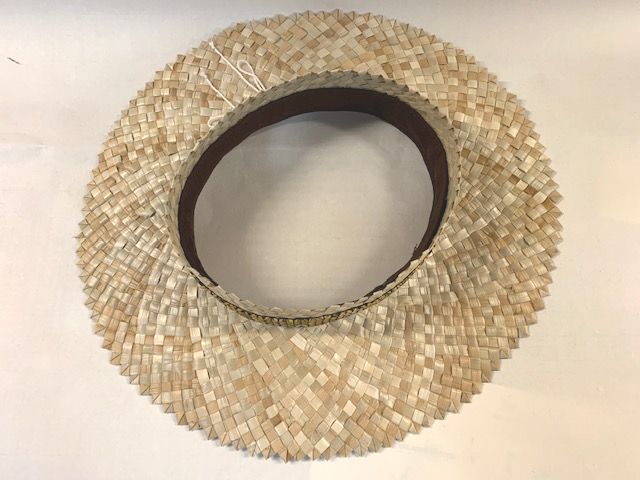 Figure 8. Top view of pā’ole hat made using an elliptical mold
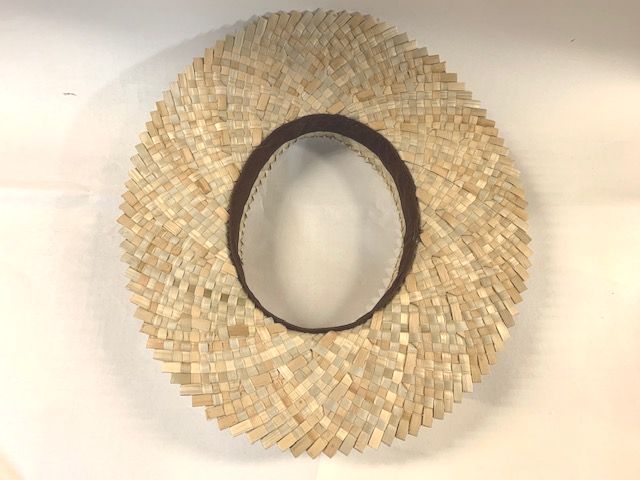 Figure 9. Underside of pā’ole hat made using an elliptical mold
Using Styrofoam for an Ipu
On YouTube there are several good instruction videos on making hat molds from Styrofoam and craft foam. More approaches can be found by using the search term “making hat molds” ( without quotes ).
Where we live in Hilo, Hawaii, craft foam appears to be only available via the Internet. Large pore Styrofoam is available in 2 inch thick sheets several feet square. The wood putty ( Home Depot ) for coating the Styrofoam and the proper glue for gluing Styrofoam together ( Ben Franklin ) is shown in Figure 10 below.
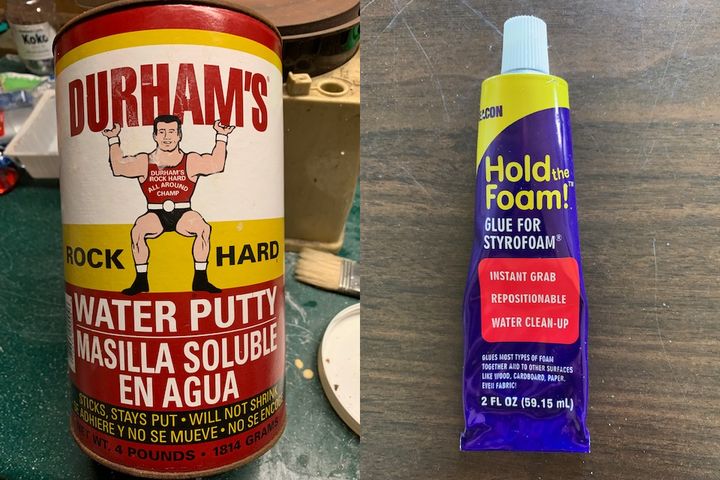 Figure 10. Putty and glue for Styrofoam
Making the Ipu
Here is a brief overview of making a Styrofoam ipu using the above materials.
First begin by deciding what shape and style of hat you’re going to make. Then using a tape measure, measure your head size. Then decide whether you are going to have a circular or oval ( elliptical ) mold. Draw the shape of future mold as seen from above on a piece of cardboard. Then after cutting out the shape, use that for tracing on the Styrofoam for as many pieces as you will need for the height of the hat. Glue the pieces together.
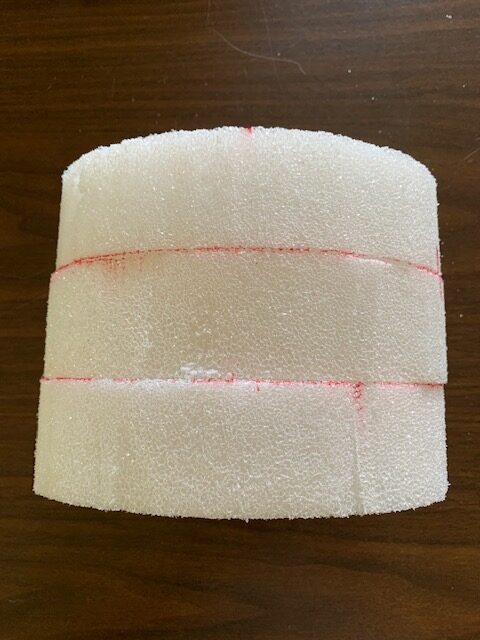 Figure 11. Several pieces of Styrofoam glued together
Now is a good time to review the two YouTube videos mentioned above. Also remember to use a face mask of some sort when you are shaping the Styrofoam so that you don’t inhale the dust. I like to make a 1″ cavity on the underside of the ipu using a Forstner bit.
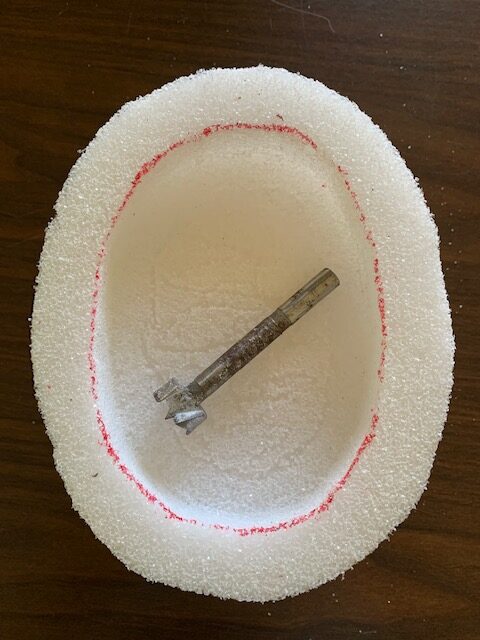 Figure 12. Underside of the ipu with Forstner bit
I use a surform tool for rough shaping and the a sanding block with 80 or 120 grit sanding paper for finishing the shape. When you have finished shaping, now is the time to gently insert a couple of chopsticks across the underside of the mold. These help me tie the string which holds the piko/pā onto the ipu later. Now is also a good time to make a series of cuts across the bottom of the mold that the string will go into later. The slots help keep the string from slipping sideways. You may have to clean them out later but at least you have a general outline as to where they are. Put as many slots as you wish…
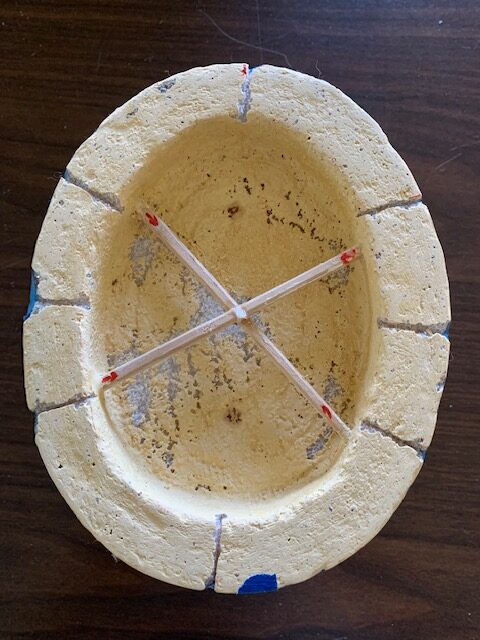 Figure 13. Showing the underside of the ipu with cross members and slots
Now it’s time to cover the Styrofoam with the putty. I use a 2″ wide inexpensive chip brush ( Home Depot ) for applying the putty. When mixing the putty, put a 1/4 cup into a plastic container. Now slowly add water and mix thoroughly with each addition, adding a little at a time. You want a final mixture that is fairly thin, much like thick soup, so that it is easy to apply and spread with the brush. Only do the sides and top of the ipu the first time. The pores of the Ben Franklin Styrofoam are large. And you want to fill ALL of them with the first coat if you can. That means that you will need to keep brushing and adding the putty to the ipu. Take your time and be as thorough as possible. The finished first step should look like Figure 14.
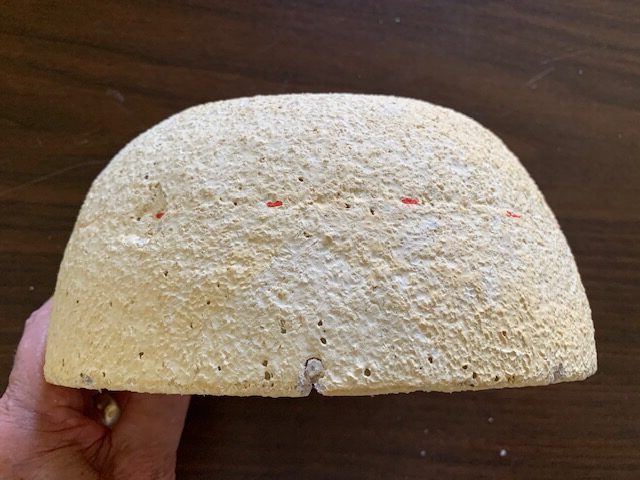 Figure 14. Styrofoam covered with one coat of putty
Wait a couple of hours, put on a pair of gloves and rub the outside of the ipu. This will remove the sharp points on the surface and leave a more non-slip finish. At this point you need to decide whether to sand the outside more like in the videos or leave the surface as non-slip.
When I made a very smooth surface, it was pretty slippery and a little hard to tie the piko/pā on and keep it in place. So the next hat I make will be using an ipu with the non-slip surface. Stay tuned for results!!