Introduction
In this page we create a lauhala weaving practice tool for working on different types of lauhala weaving patterns and add-ins. The tool is simple, inexpensive and easy to make. Since the writing of these pages, through the generosity of Jim Skibby, we have been able to download and put his book about weaving a pāpale lauhala on the website. His chapter three uses lauhala to perform a similar function as the practice strips below. If you wish to use natural materials rather than the plastic, please check out his chapter three.
It often happens that I need to practice different weaving techniques involving many pieces (koana) of lauhala. And sometimes I don’t quite get it right and have to re-do the operation. That means that the koana sometimes break necessitating either adding in or starting completely over. Not good for mental health.
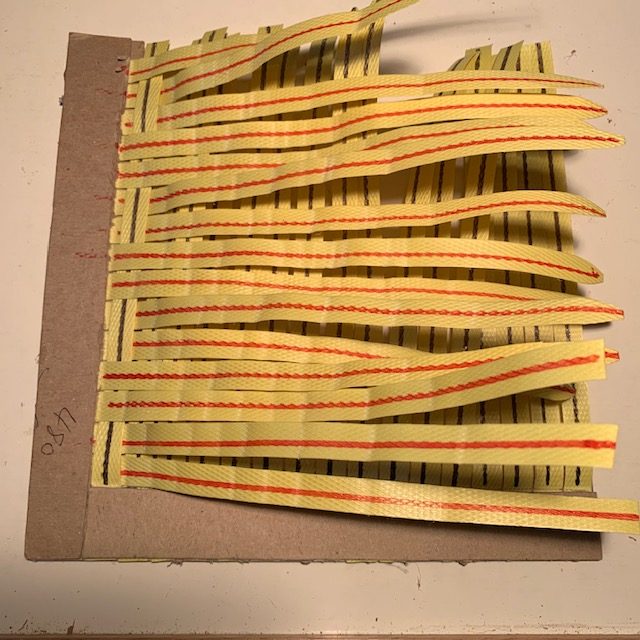
Figure 1. A simple weaving tool for practicing different weaving techniques
So I created the weaving tool in Figure 1. It’s made out of strapping tape (in a rather garish color but all I had) and mat board held together with hot glue. Assembly instructions follow.
List of Materials and Tools
To make the weaving tool shown in Figure 1, you will need about 25 feet of strapping tape (1/2″ wide), a couple of pieces of 8 1/2″x 8 1/2″ mat board, scissors, a mat knife and a hot glue gun.
Cutting the Tape Pieces to Length and Marking Them
Cut the strapping tape into 8 1/2″ lengths and put a red stripe the length of half of them and a black stripe the length of the other half, or any other pair of contrasting colors that you choose. Now separate the strips into two completely separate piles so that you don’t mix colors when you are hot gluing them to the mat board.
Cutting the Mat Board
Cut two 8 1/2″ x 1″ pieces from one of the mat boards.
Draw two 1″ wide lines on the other piece of mat board as shown in Figure 2. Then make a smooth curve to join the two lines together. Using a large jar top can provide an easy approach to do this. The purpose of the curved section is to strengthen the corner. Cut along the straight and curved lines that you have drawn so that the mat board now looks like the one in Figure 2.
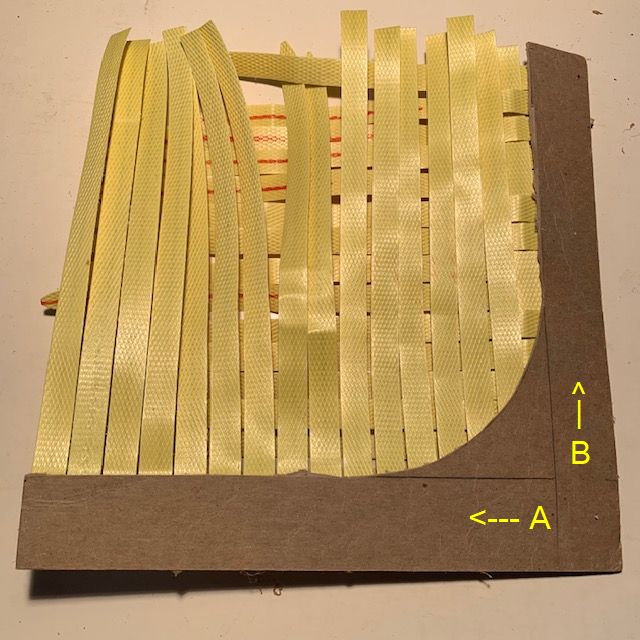 Figure 2. Showing how the Mat Board Should be Trimmed before Gluing the Tapes.
Firing up the Glue Gun
Turn on the glue gun and wait until the hot glue easily flows. Using a glue gun is an inherently dangerous operation, at least for me. There is no rush to do lots of tapes at the same time so please be careful and go slowly.
Putting the Tapes onto the Mat Board
Beginning at “A” in Figure 2 we are going to hot glue in all the tapes that run in the vertical (up and down) direction. The colors of the tapes should be on the top of each tape. But if they’re not, you can just draw them in again.
Hot glue the first tape so that the bottom edge of the tape aligns with the bottom edge of the mat board and the right edge of the tape aligns with the vertical pencil line to the right of “A”. Try to make this first tape parallel to the edge of the “B” section all the way to the top. Now add the second tape parallel to the first strip and about 1/32″ over. You’ll need this extra room to make it easier when you do the actual weaving process because the strapping tape is less flexible than the koana.
Continue gluing until you have reached the end of section “A”. When you are finished there should be about fifteen tapes of the same color all headed in the same direction.
Now it’s time to glue in the second set at right angles to the first set. That is, all of these tapes will go horizontally, right to left. Analogously to gluing the first set, you will begin at “B” and work your way up the right hand side of the form until you’ve finished.
The end of the first tape should align with the edge of the mat board to the right of “B” and the left edge of the tape should align with the pencil line above “A” in Figure 2. Now add the second tape parallel to the first strip and about 1/32″ up. Continue upwards until you have finished adding in all the horizontal pieces.
Gluing in the Two Smaller Pieces of Mat Board
Let’s glue in the reinforcing mat board pieces that you cut earlier.
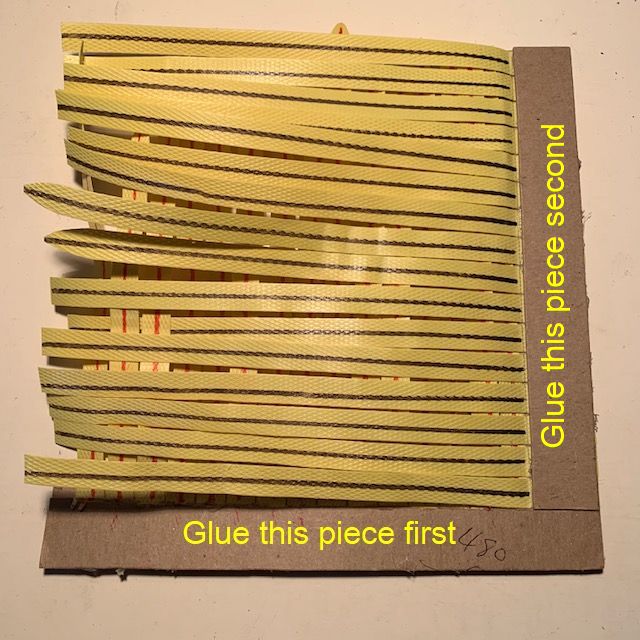 Figure 3. Showing the first piece to be glued in to reinforce the weaving tool framework.
Now you need to glue the first 1″ x 8 1/2″ piece of mat board to cover all of the vertical tape pieces. For me it’s easier to put hot glue generously the length of the mat board either in stripes or a zigzag pattern and then press it down over all the pieces at once. When you’re done with that, the first piece looks like the bottom of Figure 3.
Next, take the second piece of 1″ x 8 1/2″ mat board and glue it to cover the horizontal black striped tapes. Trim off the 1″ or so of mat board that’s sticking out the upper end of the tool and you’re ready to weave.
The tapes will be somewhat stiff to use at first, and after use will want to bend in awkward directions when the weaving is undone. No problem. Just use the back of a comb or your koana softening tool to gently straighten them out again and off you go.