Introduction
This page shows the sequence and purpose of periodically doing lock folds when weaving materials into a box or bottle cover. This technique was shared with me by the late Jo Ann Park during a class at the Kamana Senior Center in Hilo, Hawaii.This sequence shows a more traditional way of holding pairs of koana in place as compared with clips or bobby pins. There are four pictures in the sequence. The folds in this sequence are for standard diagonal weave (maka moena).
There are several reasons for doing the lock fold. If you want to stop work for the time being (however long that may be), doing the lock fold on each pair of opposing lauhala strips will keep the weave tight. You could also do the folds periodically, every five maka or so, to keep track. Another reason for doing the lock fold is to check that you, the weaver, haven’t by accident either skipped or added a row during the weaving process cycle. If at the end of a cycle of weaving, all the lock folds and maka line up, then there aren’t any missed or added extra rows and weaving can continue.
There are two directions in the weave sequence: from lower left to upper right (ku) and from lower right to upper left (moe).
Please remember that it’s important to continue to mist the strips lightly in order to maintain their flexibility. We don’t want the strips to be obviously wet, but rather slightly moist all the time.
Weaving the Lock Fold Sequence
The weaving example we’re going to use is formed around a wooden cylinder for the purpose of making a water bottle cover. The cylinder is made of redwood and is about 3 inches in diameter and 10 inches long. The cotton string seen on the mold holds the weave temporarily in place as does a rubber band in later pictures.
In Figure 1, the wooden mold is on its side with the bottom of the mold in the left direction. The weaving is progressing from left to right. The ku strips are labeled with capitol letter A and a number (A1, A2, etc). The moe strips are labeled with numbers and a small letter (1a, 1b, etc.). The red circle shows a finished lock fold.
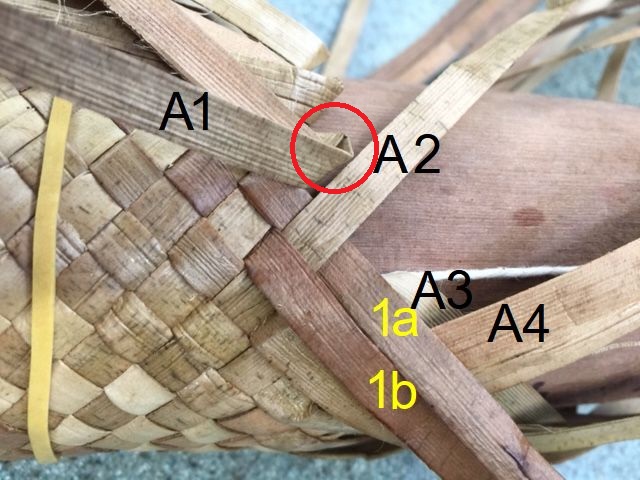 Figure 1. The beginning of the sequence
Strip 1a will be folded back on itself over strip A2 in the first step. Strip A3 is temporarily folded back to keep it out of the way.
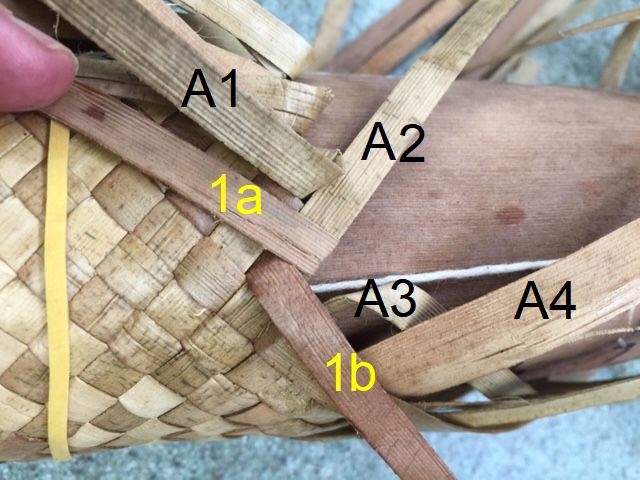 Figure 2. shows strip 1a bent back over A2.
Figure 3 shows strip A2 partially turned under strip 1a. You will see the dull side of strip A2 until the fold is finished.
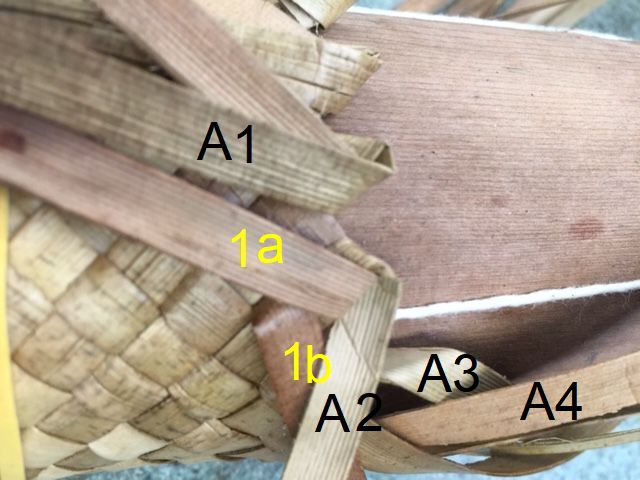 Figure 3. strip A2 partially turned under strip 1a
Figure 4 shows the completed fold with strip A2 covering strip 1a. Strip A3 now needs to be straightened out and made parallel to strip A4.
Now strip 1b will go under strip A3 so that the process can begin again. Once again, if at the end of a given cycle of weaving all the lock folds line up, then there aren’t any missed or added extra rows and weaving can continue apace.
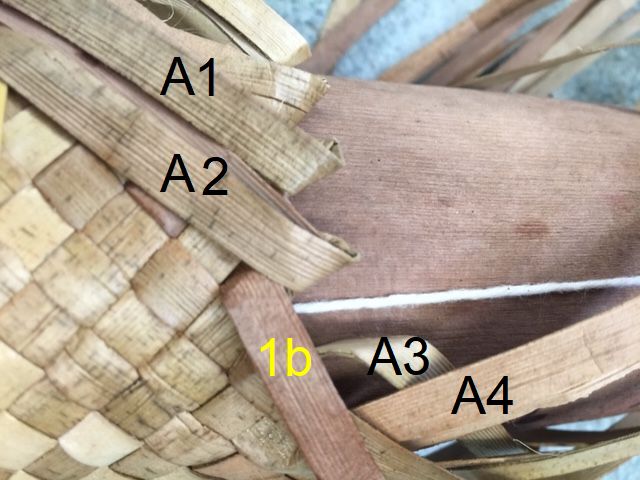 Figure 4. The finished lock fold sequence with A2 covering 1a