Useful Things For the Building Process
Leveling Frets – I use a 320 grit, 2″x6″ diamond whetstone available from any number of hardware supply catalogues for about $35. Although the grit seems small, it cuts quickly and cleanly. I used to use the “old file” beloved of many luthiers. Then tried a small fret leveling device from Stewart MacDonald’s Guitar Shop Supply having a sheet of plate glass and changeable sandpaper; it was a failure in my hands. The sandpaper attachment system was poor, the sandpaper wore out quickly and the glass plate came off in less than a week and had to be re-glued. All this for the same price as the above whetstone, which shows no sign of wear after about 70 fretboard’s use.
Yellow Glue Cleanup – I’m one of those guys who spreads yellow glue with a finger or two and is forever wondering what to do with the leftover glue on the finger when clamping time comes. No more. I keep a shallow dish with a fairly wet coarse sponge in it to dab my finger on. A paper towel nearby removes finger water and I’m off to clamping in a better state of mind.
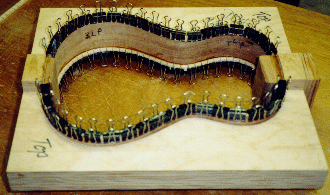 Lining Clamps – although known well to the pro’s, many beginners may not realize how excellent the various sized black metal ACCO binder clips found in stationers stores are. I’ve used some for as long as 8 years now, and they show no signs of wearing out. There are three sizes and all three are useful: the small and medium size work well for clamping linings on instrument sides; the largest size is good for opposing ends of back braces onto backs. It doesn’t take long for fingers to get sore using these things so while you’re at the store also purchase some SWINGLINE rubber finger tips. Size 12 works well for my index finger and size 14 for the thumb of my right hand. I also use these rubber finger tips for two other purposes. The first is when I’m scraping lacquer with my 3/8″ chisel prior to bridge gluing or when I’m using a small finger plane for shaving braces; I use a tip on thumb, first and second fingers for better holding control and less wear and tear on the sides of my finger tips. The second is when I’m in the fretboard leveling process. I put the smaller size on the end of a piece of broomstick and then the larger size over that. Strips of 320 and 400 grit wet/dry paper are then wrapped around it for use in rounding and smoothing frets–saves on fingers once more!
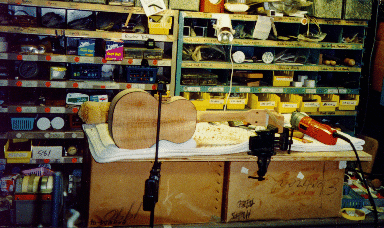 Back Problems Alleviated by Working Standing UP! – For reasons not germane to this discussion, I’ve found that I can’t work sitting down for very long without having a variety of painful back and middle body problems. After visiting Steve Grimes’ shop on Maui, I rearranged my regular worktable so that nearly all of my tasks can be done standing. Often it’s just a matter of taking two sturdy cardboard boxes side by side and placing a 2’x3′ sheet of 3/4″ plywood on top to bring things between chest and waist level. The plywood is then covered with a towel or an inexpensive moving blanket, the latter cut in half lengthwise and re-sewn at the edges by my wife. Sponge rubber mats or several thickness of carpet in the standing area also help, as do the Dr. Somebody’s foam inserts for shoes. In the background can be seen a many compartmented wall. The local sundry store periodically changes over its nuts and bolts displays to other forms and sells the old ones. These were $5 each. The width of each compartment can be easily altered by removing some of the dividers.
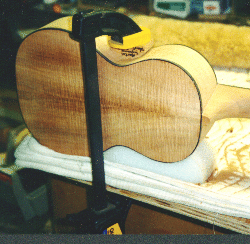 Simple Clamping for Instruments – When finish carving the heels of my instruments, I use a simple approach for holding the instrument on its side. As seen in the first photo, a piece of shaped foam rests beneath the instrument, while a pair of shaped, cork-lined wooden cauls rest on the waist. The type of foam I use is generally found in the packing of appliances, is often pale blue or white in color, is in layers ~ 1/2″ thick and is quite firm but flexible. The long clamp then is closed until the foam compresses 1/8-1/4″. This is usually firm enough.
 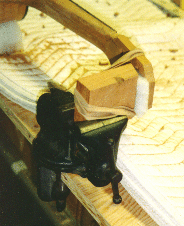 The other end is held with a 1/2″x7″ rubber band onto a beveled block with a foam insert to prevent scratching the back of the headstock. When the instrument is turned over, so must the block be in order to maintain the correct bevel angle.
Great Shop Cart! – Rubbermaid makes a very nice little four tier cart about 30″ high by 18″ long by 12″ wide. It has surprisingly good caster wheels that don’t seem to stumble too badly over cords and such. I use it for carrying all my “Pony” clamps from place to place, as well as a temporary work surface while I’m at the bandsaw or edge sander or drill press. It was about $25 on sale at one of the grocery stores here and has served the shop well.
Air Conditioner Care – We use a small Panasonic air conditioner to cool and a Sears Dehumidifier to dehumidify the shop. They keep the relative humidity at about 50-55% year-round. Although I have a central vacuum dust collection system for my sanders and saws and an Ortec electrostatic air cleaner for the sub micron stuff, there’s still plenty of dust to go around. The filter screen on the air conditioner keeps moths out but not dust, so I simply gently vacuum the cooling fins every morning with the brush attachment for our portable floor vacuum. It is necessary to do this, as I found one afternoon when I opened the air conditioner front to discover why water was dripping down the front: there was 1/4″ of ice covering the whole cooling fin area because all of the fins were clogged with fine dust! Sigh… Update! On periodic maintenance this weekend, I discovered that the squirrel cage fins were almost totally clogged with dried koa dust so that relatively little air was being moved past the cooling fins and back out into the room. So, 45 minutes later, after removing several other sets of fins to get at the rotor vanes and scrape each one clean, all better.
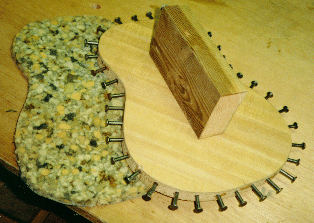 Looking like something out of the Marquis de Sade School of Lutherie, this Work Form is extremely useful for holding an instrument during various working operations. Once or twice a year I visit the local countertop manufacturers who allow me to carry off as much scrap as my car can hold. o boy. The first photo shows that this device is constructed of 3/4″ pressed wood with the Formica underneath rather than on top. A piece of 2″x4″ is nailed or screwed onto it as a handle for the heavy vise to clamp onto. Holes are drilled along the perimeter every inch or so and a drop of super glue goes into each hole followed by the nail.
 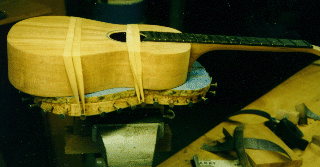 Lots of nails means great flexibility in body clamping arrangements. The pad beneath the press board is scrap carpet padding obtained (free of course!) from any of the local carpet places. Side View (in action!) The second photo shows a tenor ukulele held on with large rubber bands. Generally I use the 1/2″x7″ sizes available from local stationers’ stores. If the rubber bands are too short, simply loop them together; if too long, hook several nails at a time instead of just single nails as shown in this picture. The instrument is off center somewhat because I’m rounding the edges of the lower bout and like to have it sticking out over the edge of the form a little.
Band Saw Blades I use thin kerf, low tensioned, silicon steel band saw blades from the Gschwind Group (800-234-7297; fax 516-289-7156). Art Gschwind has an almost evangelical enthusiasm in dealing with the subject of band sawing and the type of blades he sells. Their blades are reasonably priced and have an unlimited time and performance guarantee. I use a thin kerf (0.032″), 3 tpi, 3/4″ blade for my 14″ bandsaw with 6″ riser extension for re-sawing koa, redwood and western red cedar. I’m able to re-sharpen each blade about 6-8 times before it’s no longer usable, and am getting better at it with each blade. Periodic spraying of the blade with PAN vegetable oil as suggested by Art has eliminated pitch buildup and lengthened the usage time of a given blade considerably. The free 20 page guide describing the Gschwind Group is a treasure in itself for all of the useful advice contained therein regarding band sawing in general and the care of their blades in particular.
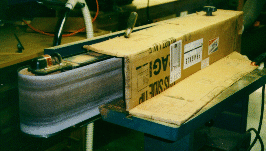 Edge Sander Alterations When I got this edge sander, I wasn’t sure whether to laugh or cry. First none of the nuts and bolts were there to put the stand together, then it took about an hour of grinding and filing to adjust the work table so that it would become level. Changing the belt drive from horizontal to vertical caused the belt to try to leap off opposing ends of the drive cylinders. The “Big Boy 80″ was in fact an 89” belt sander which I found out to my chagrin when I ordered new belts. Added to the fact that the cooling fan of the motor blew across the vacuum dust intake spraying dust into the room whenever the machine was used, I was feeling a little bummed.
 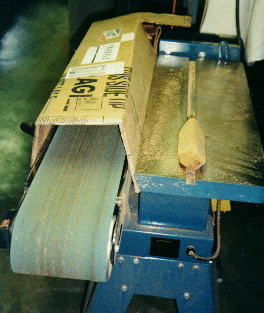 The reality and the device description from the catalogue were not equivalent. I live at the end of the road and shipping and returning this heavy piece of debris was not an option. 90 degrees different, same chute What to do? Well, a 6″x8″ sheet of cardboard with a slot for the motor shaft fitted over the motor and effectively diverted the air flow while still cooling the motor. Feeling that any warrantee on the instrument was worthless at this point, I also added another on/off switch to the opposite side of the sander from the existing one; how to do this was found in the Time/Life series on Home Repairs gotten from a second-hand bookstore. Much sanding is done on the end of the belt both in horizontal and vertical positions; the two accompanying photos show a cardboard dust guide held in place with clamps. I’m considering a dust hood above the sander but am stuck at the moment regarding the exact design since I don’t want to interfere with the overhead lighting. Hmmmm. Any suggestions would be quite welcome in this regard.
Telephone Lights! When working in the shop and the machines are going, it’s hard to hear the telephone ring in the next room. But now, since I purchased a “Realistic” brand “Fone Flasher” from Radio Shack, the shop is ablaze with lights every time the telephone rings. This device (costing ~$15-20) plugs in the wall three prong socket and somewhere along one’s telephone line as well. Then any number of lights may be plugged in an auxiliary socket on the “Fone Flasher” itself. We prefer the tiny Christmas tree lights of varying colors strung out in all directions, as well as a string of jalapeno pepper lights from friends in Houston.
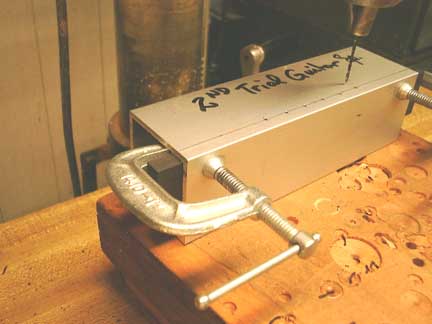 Here’s a simple idea for a bridge drilling jig. I buy 2″ square extruded aluminum tubing from my local aluminum window dealer. A foot or two is plenty. Make the length of the aluminum tubing the length of your bridge blank. I usually make my blanks about 1/2″ longer on each end than the final length. The channel between the tie block and the saddle slot should already be cut and made deep enough so that when the holes are in the vertical middle of the bridge tie block side, the hole will go into the channel slightly above the bottom. The inside corner of the tubing has a slight radius, so you either need to remove that or slightly round the bottom back edge of the bridge. I do the latter.
 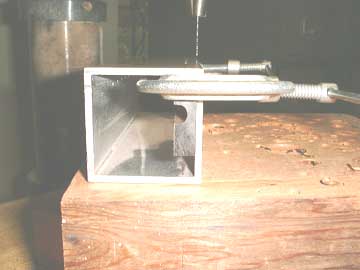 Now you need to measure the hole spacing that you want laterally across the tubing and how far in from the edge the holes should be. The latter distance will be equal to the thickness of the tubing wall plus half the height of the bridge tie block. The second picture shows the side view of the bridge clamped into position. I use a 0.060″ drill bit and take two-three passes at cutting each hole. The drill bit heats up easily in ebony and what’s the rush anyway? The economy-minded will already have figured out that there are eight possible clean surfaces for drilling. One piece of tubing does all possibilities for tenor ukulele bridges (4, 6, and 8-string) plus left-handed versions!
If you enjoy the technical side of things, please consider buying my book “Left-brain Lutherie” . Although no longer sold by StewMac, you can buy directly from me.
I enjoy writing these pages and hope that they are interesting and useful to the reader. I’ve stopped building at this time and still need to generate some income in order to continue to expand this website with more useful articles. If this page was helpful to you and you would like to make a $5.00 donation in order to have more pages like it, please use the donation button below. Thank you.