Edge Gluing Tops, Backs and Sides
This article comes into being at a time that I’m edge gluing about a hundred fronts and backs for tenor ukuleles (a year’s worth ~ 50 instruments)— “body parts” production as one luthier has described it. This particular device came into being a number of years ago when I began to make more than one instrument at a time. There are many solutions to edge gluing book matched pairs of wood for fronts and backs; I don’t claim that this design is original, but I don’t remember having seen something like it written up anywhere — so here it is. I like this method because the glue edges are aligned and flattened under pressure at right angles to the final top/back surface before lateral gluing pressure is applied at the edges. This means that you can still edge glue pieces that aren’t perfectly flat, but which will still work quite well for backs.
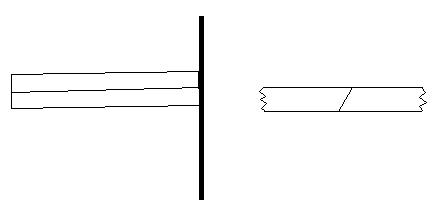
I do preliminary edge smoothing and alignment using 120 grit sandpaper on an 84″ edge sander. It is important to sand the pair of pieces together so that if the two pieces don’t have a 90 degree glue face relative to the upper or lower surface, the angles will be complementary and a good glue joint will still obtain. See first figure below for concept. The left hand side of the figure shows the pair of pieces being pressed against the sanding belt (dark line) at an exaggerated angle; the right side shows the glue joint angle as not vertical but still workable; instead of a butt joint, it’s a scarf joint. If there are light gaps in the glue joint when the two pieces are pressed together on a light table, I then clamp the belt and holding the two pieces together again, gently sand the inconsistent areas on the belt by hand until no gaps remain. Some pieces are perfect from the running belt, others which are interesting from a grain variety standpoint for backs are very inconsistent in their hardness and may take some time to get a clean edge. The outer edges don’t have to be parallel, but should be smooth so that even clamping pressure can be applied.
 I use yellow carpenter’s glue for my edge gluing. I back up all my book matched joints with another wood strip (on the back) or braces on the front, I’ve had no problems. In the tropics, hide glue does not do well because of high heat and humidity encouraging fungus attack; less “natural” adhesives do not suffer this problem.
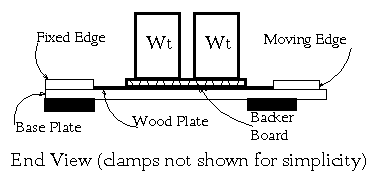
The figure below shows a side view of my clamping jig. A plan view is somewhat further down. I begin with a piece of 3/4″ plywood (1 side good) or Formica countertop about 6″ wider and longer than the final size of the edge glued pieces. This is the base plate. To one long edge of the base plate is glued a board of the same thickness and length and about 2″ wide (Fixed edge). One outer part of the top or back pieces will rest against this edge, so that corner of the join should be clean of glue squeeze-out. A second piece of wood of similar size, the movable edge, will support the other outer part. Two more similar size or thicker pieces are glued underneath the base board to facilitate squeeze clamp access to the moving edge piece. A backer board with weights on it will hold the sheet flat under lateral pressure and tend to align the edges before pressure is applied. The under surface of the backer board can be flat or slightly convex but not concave else insufficient pressure will be placed on the glue joint for alignment.
I use 2-3″ wide strips of wax paper or polyethylene sheet on each glue joint squeeze-out surface to prevent gluing the edge-glued top or back to the jig. “Pony” clamps 18-24″ long are used to apply the lateral pressure after the glue is applied. The process, in work order is:
Adjust the movable edge piece so that there is about 1/8″ space between it and the outer edge of the book matched pieces; this makes it easy to put down the piece with the glue on one edge.
Apply a thin layer of glue to one glue surface; smooth it out with finger or brush if necessary;put the pieces on the base board on a wax paper strip, then place another strip on top of the glue joint;put the backer board on the glue joint;put the weights on the backer board; I use 1lb coffee cans filled with lead sinkers; four for ukuleles and six for guitars. Great weight is probably not necessary nor desirable since it might bow the base board.
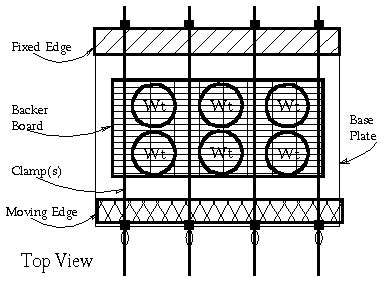 apply lateral pressure with the “Pony” clamps. I usually tighten until I see some slight compression of the wood at the moving edge piece. The movable piece must be held to the base board with squeeze clamps (not shown) or it will lift up with the “Pony” clamp pressure. Alternatively, slots may be cut in the base board parallel to and offset from the long axes of the “Pony” clamps; holes are then drilled in the movable piece above the slots and suitable combinations of 1/2″ bolts, washers and wing nuts allow the piece to move but not lift up. I used to use this method and can’t now remember why I stopped!
I wait 15-20 minutes for the glue to dry/harden, then release the “Pony” clamps, remove the weights, remove the backer board, pull the wax paper away at a low angle to the surface and begin the process again. N.B. If the weights are removed before the “Pony” clamps, the top/back will joint and greatly disturbing the observer regardless!
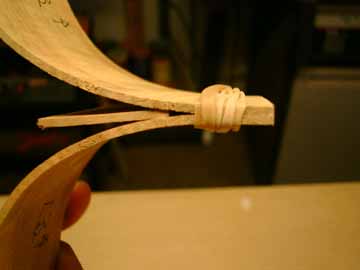 It sometimes takes many years to discover something very simple but quite useful: the same sanding approach for producing a smooth, well fitting joint can also be used for matching the ends of the sides! In the picture below, I show two sides held together with rubber bands. A piece of scrap wood acts as a small wedge to orient the two sides so that there won’t be any gap at the end where the sanding will occur. If the sides are slightly warped, it will be necessary to pinch the centers together in order to get a straight gluing edge. The actual sanding process takes only a few seconds on the belt sander. But how to know how much wood to take off? I put each side in the mold (one at a time) and clamp it in place. I then mark the center seam of the mold on the upper edge of the side for the heel and tail block positions. When the sides are removed from the mold, the marks are extended across the sides with a right angle and the other edge marked as well. I now saw off the excess wood, leaving ~ 1/8″ outside the line for each side. The two sides are put in position as in the picture above and the end marks on the edges lined up. Now sand up to the pencil line and you’re done!
If you enjoy the technical side of things, please consider buying my book “Left-brain Lutherie” . Although no longer sold by StewMac, you can buy directly from me.
I enjoy writing these pages and hope that they are interesting and useful to the reader. I’ve stopped building at this time and still need to generate some income in order to continue to expand this website with more useful articles. If this page was helpful to you and you would like to make a $5.00 donation in order to have more pages like it, please use the donation button below. Thank you.