Aligning and gluing bridges
The correct placement and gluing of a bridge to the top of an instrument is one of the most important operations in building guitar family instruments. The bridge is one of the two primary attachment points for the strings. Further, the location of the bridge and saddle control the basic intonation of the instrument. So it’s clear that we want to put the bridge in the right place and make sure that it stays there.
We have elsewhere discussed the problem of String Compensation. Using this approach or one like it for a given set of strings, we can actually measure the compensation string lengths for a given string set. If we always use the same brand and type of strings, then we can also make a template to help us locate the position of the saddle for an instrument of the same scale length and action.
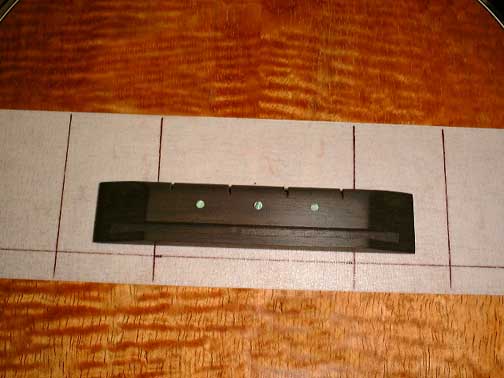
 The first picture shows the template that I’ve made for the various sized ukuleles and their associated scale lengths that I build. It’s Plexiglas, about 2″ wide, 1/4″ thick and 24″ long. For a guitar, I would probably make the length 32-36″. Because I use a zero fret, I’ve glued a little stop block on the left underside of the template. The stop block rests against the headstock side of the zero fret when the bridge is being positioned.
There are four different position lines scribed into the underside of the template: one for each different size of ukulele that I make. The distance of each scribe mark represents the shortest compensation length for each string set; this line will mark the front edge of the saddle.
We’ll first use the template to figure out where to put the masking tape. Place the bridge on the ukulele or guitar just below the soundhole. This is not its eventual location; we’re just using the bridge as a temporary rest for the template to hold it above the top of the guitar. Now put the template in place with one end keyed to the headstock end of the fretboard. Note where the compensation scribe mark is for the scale length of the instrument you’re using. Take a piece of 2″ wide masking tape slightly longer than the width of the instrument, and position it on the top so that the upper edge of the tape is about 3/8″ above the scribe mark. Now move the bridge down so that the scribe mark is above the front edge of the saddle channel. There should be an approximately equal amount of tape above and below the bridge if the tape is placed correctly as in the figure above. If not, gently remove the tape and reposition it.
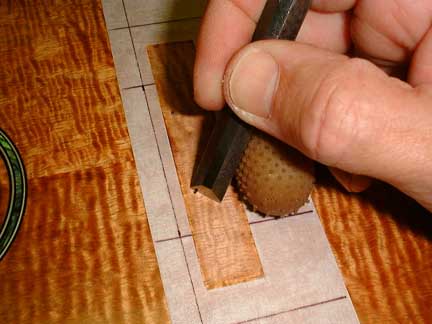
What we’re going to do now is to make a set of position lines; one set will be parallel to each side of the fretboard, the other will be parallel to the frets. The figure on the right shows a 1″ wide ruler placed against the edge of the fretboard. With a pen like a fine point Sharpie, draw lines on the tape on both sides of the ruler, being careful not to damage the finish by pressing too hard. Repeat this operation for the other side of the fretboard. Now again with the ruler against the side of the fretboard, measure a distance from the 12th fret to a point on the tape that will end up being about 1/8″ in front of the bridge when it’s in its final position. You’ll need to use the template to approximately position the bridge to do this. Repeat this for the other side of the fretboard.
 The figure on the left shows a view of the bridge in place with its associated orientation lines. The lines parallel to the edges of the fretboard allow the builder to center the bridge on the top relative to the center line of the fretboard. The line in front of the bridge allows orientation of the saddle channel when the template is in place.
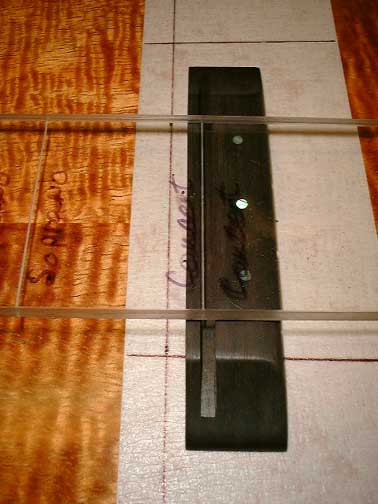
The right hand figure shows the template in place above the bridge with the scribe line at the front edge of the saddle channel.
The template is now carefully removed and with the bridge held firmly in place, the perimeter of the bridge is traced with an Exacto knife. The bridge and tape rectangle are removed.
Using a very sharp 3/8″ chisel, I then scrape the finish away to bare wood, leaving a 1/32″ border around the inside of the tape. Note that the chisel is held diagonally to the grain in order to reduce tearing of the wood (and tears from the builder…). The tape next to the bridge footprint is gently but firmly smoothed with the back of your fingernail to reduce the likelihood of glue going underneath it.
At this point, I wax the bridge using Meguiars #16 non-silicone car wax. Waxing the bridge makes for much easier glue removal later on. Let the wax dry, then buff lightly with an abrasive pad. Lightly re-sand the bridge bottom if any wax got on to that surface.
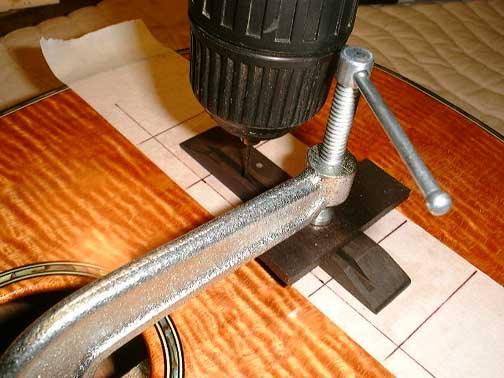 It is now necessary to drill holes in the saddle channel for positioning pins. This is an irksome job, but the alternative is having the bridge slip around during and after the clamping process. Given that it is undesirable to drill through one of the braces, determine where the braces are by feeling around with one of the clamps to be used in the gluing process. Use a pencil to mark in the saddle channel where the edges of the braces are and then drill small holes 1/8″ or so to the side, away from the brace. I use little brads as positioning pins but others use little dowels or even toothpicks. For me, the smaller the hole, the easier the process is, so brads it is. If the drill bit is a little smaller than the brad, no problem. Just nip off the head of the brad and use the brad to enlarge the hole that the drill bit has made. In the picture to the right above, you will notice that the bridge is being clamped during the process of drilling through the top. This is necessary. I usually use a drill press to drill through the saddle channel, then a portable drill to drill through the top when the bridge is aligned. The tips of the brads are not uniform, so I file the ridges off the little chiseled faces to make it easier to put them in the alignment holes.
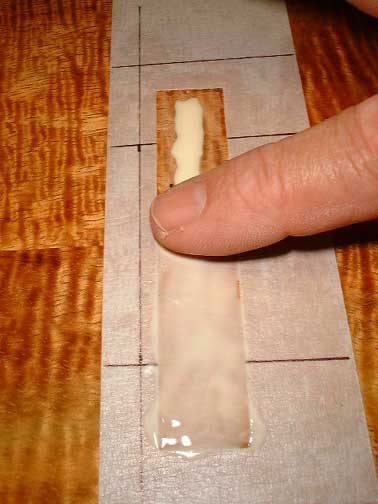
The figure left shows my perfectly manicured digit goobering up the bridge footprint with Titebond glue. One of the alignment holes is just visible (dark dot) above the center of my fingernail.
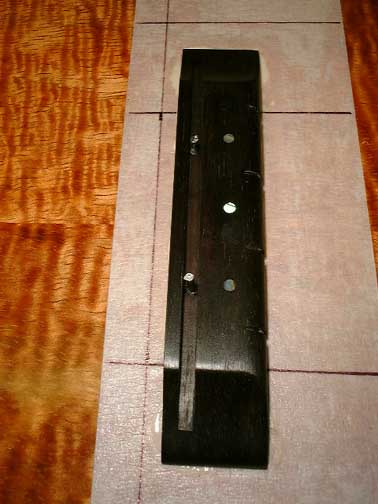
The figure to the right shows the bridge in place with the two alignment brads. I usually wax the brads before insertion for easy removal later.
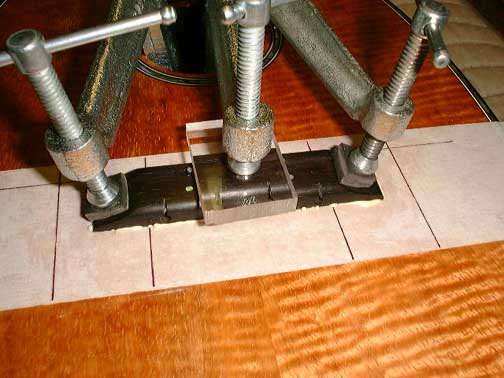 The figure above left shows three clamps in place with good glue squeeze out all around. Titebond recommends 15-30 minutes clamping and I do about 25 minutes. Better to err on the side of caution. I’m using a Plexiglas caul just slightly off center for the middle portion of the bridge and 1/4″ thick Neoprene rubber pads for the ends. You must use as many clamps as possible to make sure of a proper and even gluing pressure as discussed in the Glue Clamping page.

Depending on your humidity conditions, the glue will be ready to remove about 30-90 minutes after the gluing process has begun. The glue should have skinned over and become slightly translucent. Gently pick up an edge with some sort of pointed tool and try to peel it along the bridge-tape corner. Often a piece an inch or more will come up. Tweezers are useful at this point. You may find some soft glue underneath; allow it to dry and repeat the process. When all the readily removable glue is gone, pull up the tape. I do this my pulling the outer edge vertically until I’ve reached the middle of the bridge and then repeat the process from the other end of the tape. The bridge may have become slightly cloudy from where the glue was. Just re-tape next to the bridge and touch up with the abrasive pad you used to polish it with after you applied the wax. Wait a day before putting the strings on…
If you enjoy the technical side of things, please consider buying my book “Left-brain Lutherie” . which you can buy directly from me.
I enjoy writing these pages and hope that they are interesting and useful to the reader. I’ve stopped building at this time and still need to generate some income in order to continue to expand this website with more useful articles. If this page was helpful to you and you would like to make a $5.00 donation in order to have more pages like it, please use the donation button below. Thank you.