On the previous two pages, we’ve assembled the materials for and put together a simple compliance measuring jig, and then we went through the process of actually making a single measurement. Now what we need to do is think about what values we want to have in our finished compliance map of the top of the instrument we’re building.
Without becoming too technical at this point, we need to understand that when an instrument is strung up, there are forces which begin to act on the top which weren’t there before. The top will react to these forces in a predictable way: if the top is too weak (read: top and bracing not stiff enough) then it will be bowed down between the bridge and the soundhole and bulge up between the bridge and the bottom of the instrument. If the top is too strong (read: top and bracing too stiff), little deformation will occur but the top won’t be very responsive to the small amount of energy that the vibrating strings put into it. What to do?
The simplest approach – which follows – is to use a “successful” instrument to make your first set of compliance measurements. By “successful” I mean that the top has remained stable over a period of six months or more and the instrument has a wide response range: soft when played gently and a smooth increase in projection (read: loud but with quality) when played more strongly.
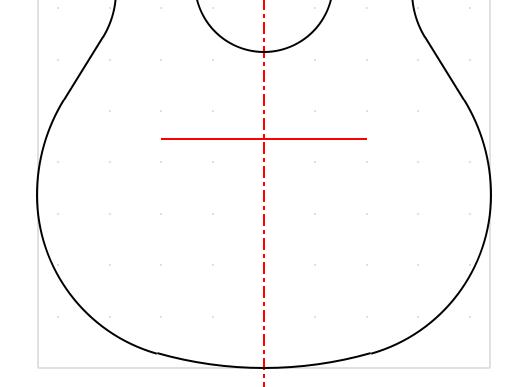 Figure 1. View of the lower bout of a guitar family instrument useful for mapping compliance values.
Figure 1 shows the lower bout for an average guitar family instrument. This drawing was created using free software ( “G” thang ) downloaded from the Liutaio Mottola website. I have inserted this drawing into a simple data sheet for compliance mapping, two versions of which are available here: MS Word .doc file and/or PDF file . The files include basic information for describing the instrument model and top condition, as well as who might be doing the mapping, the date, etc. So let’s make some measurements on such an instrument.
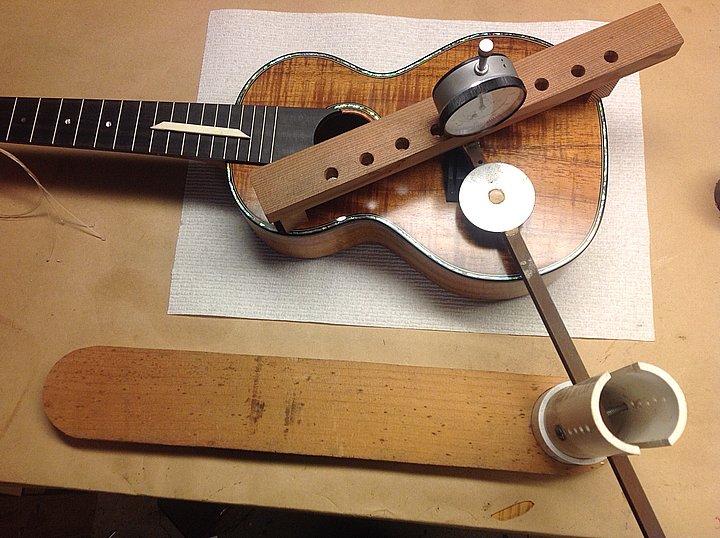 Figure 2. Measuring compliances on a completed instrument.
Figure 2 shows the compliance jig set up to make a measurement. In this case the first measurement will be on the top of the bridge. Before making the measurements, the instrument strings are removed as is the saddle, and the body must be leveled and held in place with the wedges as we did earlier for a partially completed instrument. The little blocks that support the wooden frame measure 3/4″ x 1 1/4″. Because we need to have the dial indicator stem move freely mostly in the middle of its travel range, we’ll use the blocks in the vertical position for the bridge measurements (to raise the frame up slightly) and in the horizontal position for all other measurements. The lever arm will be sufficiently level for both cases because the bridge height is small.
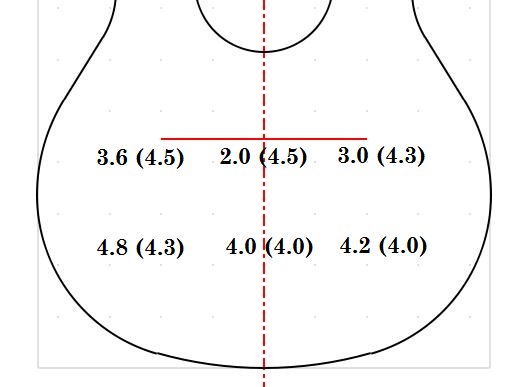 Figure 3. A comparison of compliances with and without the bridge present.
Figure 3 shows two sets of compliance measurements. In parentheses are the compliances I measured when I was building the instrument and without having the bridge glued onto the top. The numbers outside the parentheses are those measured on the finished instrument with the bridge on about seven and a half years after the instrument was finished.
Here’s the form that I completed for this instrument.
To me there are two things which stand out. The first is that the compliance numbers where the bridge is are lower (sometimes much lower!) than without the bridge. This makes sense because the bridge is also a brace which makes the top stiffer wherever its located. The second is that the numbers where there isn’t any bridge (the lower set) are mostly the same as they were when they were originally measured. To me this means that there is hope that measuring older instruments to get good compliance numbers is a valid approach.
So you have some measurements. Perhaps you’d like to share them with a friend somewhere but your friend has a different value for his effective weight. What to do? Let’s imagine that your effective weight coincidentally is the same as mine: 1.31 lbs. And his/her effective weight is 2.0 lbs. For the same instrument, a heavier effective weight must result in larger deflections. If we assume that there is a linear relationship between effective weight and deflection over small effective weight differences, then we convert your measurements to your friend’s setup by doing this:
(your friends effective weight/your effective weight) times (your compliance measurement)
So if one of your measurements is 4 mils, then (2/1.3) X 4 ~= 6.2 mils
There are more things to consider with respect to compliance values and building but we’ll save them for the next pages.